Encyclopaedia Index
Installation of PHOENICS 2025
Contents
- Introduction
- Specification of Items
- Installation Procedures
- Brief test of the PHOENICS installation
- Starting to use PHOENICS
- Parallel PHOENICS
- Appendix A. Unlocking PHOENICS
- Appendix B. Frequently Asked Questions and Troubleshooting
1 Introduction
1.1 Purpose of the document
The purposes of this document are:
- To explain how to install the PHOENICS program suite on a computer running under Microsoft Windows.
- To describe how to test the success of the installation.
- To provide new users with a brief guide on starting to use PHOENICS.
The contents of this document are applicable to both recompilable, which enables the user to
re-link the executables, and non-recompilable with which the user can only use the supplied
executables.
1.2 System configuration
To install PHOENICS, the user needs to have a hard disk with at least a total of 2 GB free space.
Additional space will also be required for running PHOENICS. How much space will depend on the size
of simulations made; for complex models it is possible to generate individual output files which
are more than 1GB in size. For efficient use of PHOENICS the user should have at least 10GB of
free hard disk space available.
PHOENICS will run on platforms of Microsoft Windows from version 7 onwards and the equivalent versions
of Microsoft Windows Server. It is recommended that the computer used for running PHOENICS has a
minimum of 8GB RAM. The amount of available RAM may limit the size and complexity of simulations made;
it is not uncommon for users to require 64GB of RAM or more.
PHOENICS is available compiled as 64-bit and double-precision 64-bit executables. CHAM no longer
supplies the 32-bit executables as part of the standard PHOENICS installation.
There are no special graphics requirements; most modern graphics cards should have no problem running
PHOENICS. However, we have found that some of the graphics cards that come integrated with the
motherboard do give slow performance when rotating the domain with result contours displayed. To
enable the clear display of results, the minimum recommended screen resolution is 1024*768 pixels.
A compiler is not a requirement for the use of PHOENICS, but users who wish to include their own Ground
coding in the PHOENICS solver will require a copy of Intel Fortran Compiler; version 18 or later is
required. This compiler is part of the Intel oneAPI HPC Toolkit.
Please note that an Administrator account will be required to install the software.
2 Specification of Items
The following items will be supplied:
2.1 Software
- A DVD containing the PHOENICS software
- A DVD containing the Intel Visual Fortran compiler (if the compiler was purchased).
2.2 Documentation
- Installation of PHOENICS 2025;TR 110 (this document)
3 Installation Procedures
The quick installation instructions are provided inside the cover of the DVD case
which should enable experienced customers to upgrade their PHOENICS version successfully.
Otherwise, it is recommended to read through the following sections before starting
installation.
3.1 Ensuring that there is sufficient free disk space
The installation will occupy 1.5 GB of disk space, so one will need at least this amount
of free disk space on the target machine before starting to install PHOENICS. In practice
though one will need many more times than this, so that there is sufficient space to store
the results.
3.2 Checking if PHOENICS has already been installed on the target machine
If an earlier version of PHOENICS is already present, it should be deleted, or the name
of the existing installation directory changed before installing the new version.
You may wish to preserve user files from working directories, such as \phoenics\d_priv1
, and user geometry files under \phoenics\d_satell\d_object\users. These can be
copied to a temporary location with Windows Explorer, and later moved to the equivalent
locations in the new installation.
To delete the old installation, open the Control Panel then in the section Programs
click on the item 'Uninstall a program'. Now scroll through the list of installed programs
and find the PHOENICS installation – the previous version was labelled PHOENICS 2023.
Double click on the line labelled PHOENICS to begin the install script and choose the option
'Remove' then click on the button 'Next' to begin the uninstall procedure.
This will remove all the files which were originally installed, but leave behind any new files
which have subsequently been added (e.g. your case files). If you wish to preserve any of these
left over files then rename the phoenics folder, otherwise delete it before re-installing PHOENICS.
To rename the old installation to, say, PHOENICS.OLD, open Windows Explorer, right click on the
\PHOENICS folder, then on Rename and type in PHOENICS.OLD.
If a previous version of PHOENICS exists on this PC, and you do not rename or remove it,
some of the old files may not be overwritten by this installation process. The installation
process will finish normally, but some modules may not function as expected.
If you have an old version of PHOENICS on your drive C:, and you would like to keep it
on the C: drive, you can create a virtual drive and install PHOENICS on this virtual drive,
with no need to rename or remove your old PHOENICS from the C: drive.
Click on 'My computer' icon to ascertain what drive letters are in use. Usually the C:
drive will be the user's local hard drive and D: a removable drive (e.g. CD or DVD), other drive
letters may already be in use for mapped network drives. Suppose the drive P: is not in use,
you can create a virtual drive P:.
First, make a root level folder with a suitable name, e.g. C:\PHOENICS2025; then in a Command
Prompt window, enter the command
SUBST P: C:\PHOENICS2025
You now have a virtual drive P: onto which you can load PHOENICS 2025 without affecting any
older version of PHOENICS you may have on C:.
Please note that any subst drives are not remembered after a user logout.
The drive will need to be re-created at each logon. This can be achieved by creating a batch file,
say map_drive.bat (within which is written the subst command above) and include this in
the Startup folder under the Start menu.
3.3 Changes to the Intel FORTRAN Compiler for PHOENICS
The general PHOENICS user does not need to have a compiler installed. However, for experienced
PHOENICS users, the option exists to include specialised user written Ground coding in the solver.
So, only for those users who will be using their own ground coding with the solver a compiler is required.
The Intel OneAPI (formerly Intel Parallel Studio XE) suite may be purchased either from a local reseller
or directly through Intel.
The user will also require a copy of the Microsoft Visual Studio to be able to link the new code.
The compiler version used to build PHOENICS has once more been updated. This was necessitated as the previous
build used a combination that would not allow for the use of current version of the Intel FORTRAN compiler
(OneAPI 2025). Further, the Intel OneAPI 2025 suite requires the use of Microsoft Visual Studio 2019 or later.
These changes mean that that versions of Intel Parallel OneAPI prior to 2021 are no longer supported
with the standard installation of PHOENICS.
In order to successfully link any of the PHOENICS modules it is recommended that users also install a
copy of Microsoft Visual Studio 2019 or later prior to installing the Intel OneAPI Base & HPC Toolkit.
It is necessary to use these versions of Visual Studio and not an earlier
copy to avoid any mismatch in the libraries.
The Intel FORTRAN Compiler is normally provided as a download executable and when installing it
would normally suffice to follow all the default options.
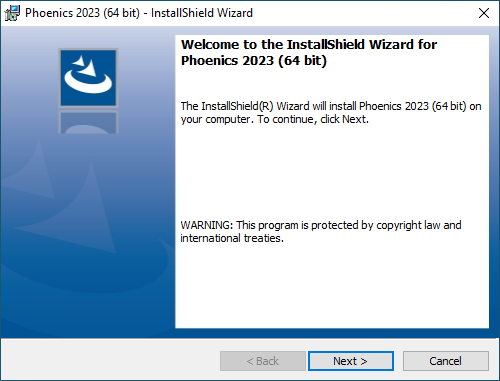
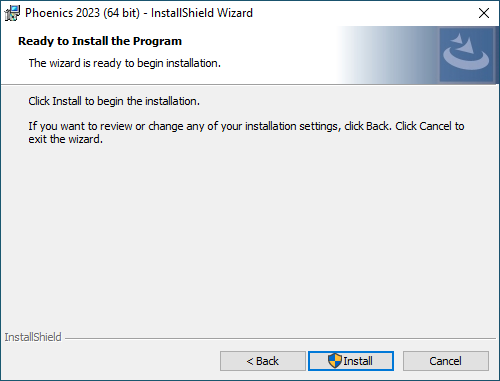
3.4 Installing PHOENICS
Follow the steps below to install the entire PHOENICS program suite on to the hard
disk.
- If PHOENICS came on a DVD, load the DVD into your DVD reader; the setup program will
automatically start. If PHOENICS came as a download; start the program phoenics.exe.
- There are five pre-requisites for PHOENICS 2025 which are necessary so that the correct DLLs
are available to run the various PHOENICS modules, they are
- Microsoft MPI (version 10.0.12498.18 supplied)
- Microsoft .NET Framework 4.7.2 Web
- Microsoft Visual C++ 2010 Redistributable Package (x64)
- Microsoft Visual C++ 2013 Redistributable Package (x64)
- Microsoft Visual C++ Redistributable for Visual Studio 2015, 2017 and 2019 (x64)
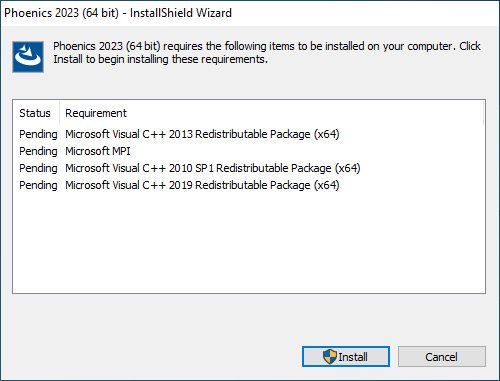
Any items which are already installed on the destination machine will be absent on the above list.
If all items are present then the installation will skip this step.
Microsoft MPI (MSMPI) while associated with running of the parallel solver, is still required when
running the solver sequentially in order that all the necessary DLLs are loaded at run time.
The PHOENICS solver is not sensitive to the version of MSMPI, so if you have an earlier version
installed that will normally suffice.
When installing Microsoft MPI, unless your company policy requires otherwise, it is recommended to
accept all default settings.
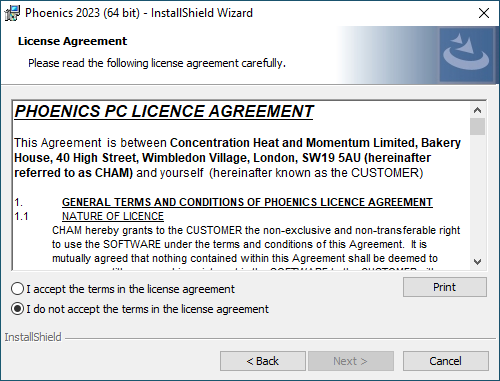
- Once the pre-requisites have been installed the installation will move on to the PHOENICS options
If you do have a previous PHOENICS installation refer to section 3.2 above for instructions
on how to proceed.
- First one will need to accept the license agreement
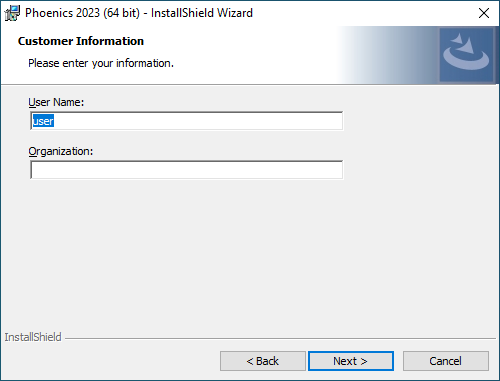
- Next set your customer information
- Then select the installation location
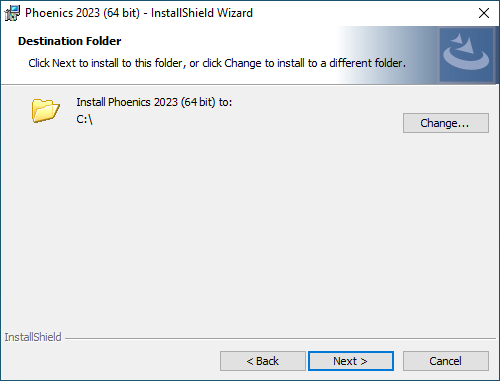
In response to the screen prompt for the location of the phoenics directory, the user must
specify the target location if other than C:\phoenics. Ideally the phoenics directory should
be located in the root of whichever drive was selected for PHOENICS to be loaded on, but it
can be installed elsewhere.
- This completes the available options and the Install option now starts to copy the files to your computer.
An environment variable 'phoenics' is created by the installation process, and this variable
is set to the pathname of the location of PHOENICS. For example, if PHOENICS is loaded into
c:\phoe2025\phoenics then the value of the environment variable 'phoenics' is set to
'c:\phoe2025\phoenics'.
While it is possible to install within the directory 'C:\Program Files' it is not recommended
for two reasons; one is that POLIS html files use absolute links which will not work unless
phoenics is at the root level and two the phoenics folder will be read-only for non-administrator
accounts (see FAQs in Appendix B).
- If the installation is successful, the user will see two PHOENICS icons,
PHOENICS-VR – 2025 and PHOENICS Command Prompt created on the desktop.

The PHOENICS-VR icon is a shortcut for the PHOENICS GUI; the WINDF icon is the shortcut for a
Command Prompt window with the correct path for running the INTEL Fortran version of PHOENICS;
POLIS icon is the shortcut for the PHOENICS On-Line Information System.
If PHOENICS is installed on one disk drive (e.g. C:) and the working directory is on a
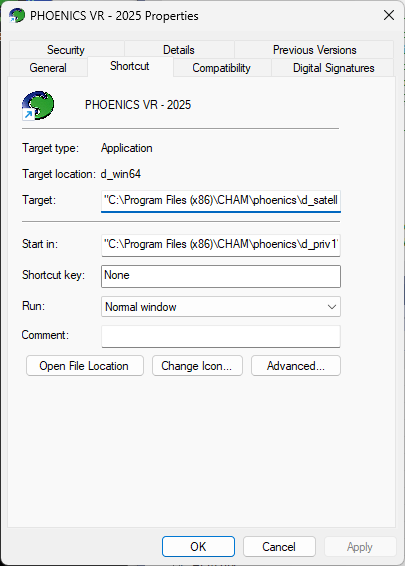
different drive (e.g D:), then the PHOENICS-VR icon will require changing. Click on the
icon with the right mouse button, select Properties and Shortcut, and change the drive
letter in the filed 'Start in:' to be the required letter, in this case D:.
3.4.1 Notes regarding installation prerequisites
There are five prerequisites which are included with the PHOENICS 2025 installation which are
- Microsoft MPI (version 10.0.12498.18 supplied)
- Microsoft .NET Framework 4.7.2 Web
- Microsoft Visual C++ 2010 Redistributable Package (x64)
- Microsoft Visual C++ 2013 Redistributable Package (x64)
- Microsoft Visual C++ Redistributable for Visual Studio 2015, 2017 and 2019 (x64)
The first Microsoft MPI is required to run the PHOENICS solver Earth. It does not matter whether
you will only run the solver in sequential mode (and not in parallel), it is still a requirement to
install it otherwise the solver will fail to load the necessary DLLs at run time. However, the solver is
not sensitive to which version of Microsoft MPI, so if you have an earlier version of Microsoft MPI installed
then it is not necessary to upgrade. If you don’t have a copy of Microsoft MPI, then the installer will
install version 10.0.12498.18.
Microsoft .NET Framework 4.7.2 is required for the Earth solver (eaxexe.exe), in particular the new
GUI. In most cases this should already be installed as part of the Windows OS, but is provided as a
Web package for those who may have an older version of Windows.
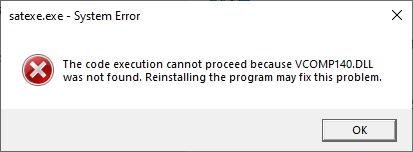
Microsoft Visual C++ 2010 Redistributable is used by the utilities datmaker.exe and osgcansee.exe.
The PHOENICS suite of programs was built using Microsoft Visual Studio 2019 which requires the Redistributable
Packages to be installed, without these you will likely get the following message when you start any PHOENICS module,
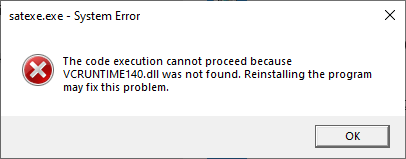
followed by
4 Brief test of the PHOENICS installation
Before running anything more complex, it is recommended that the user tries running a simple case
from the PHOENICS library of cases to check the software unlocking and that the necessary DLLs are
being loaded correctly.
4.1 PHOENICS VR
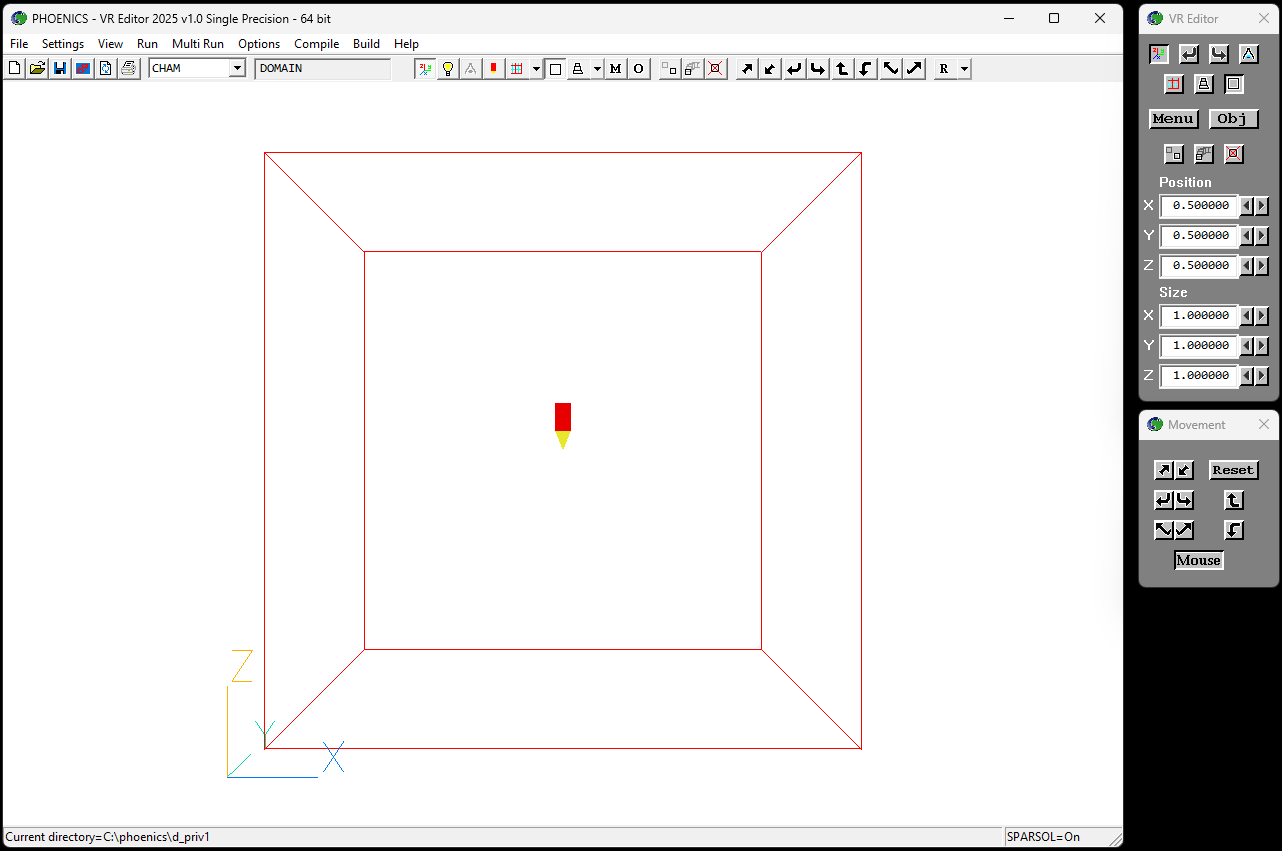
Double-click on the CHAM icon, labelled 'PHOENICS VR' in the desktop. The screen shown below
should should appear.
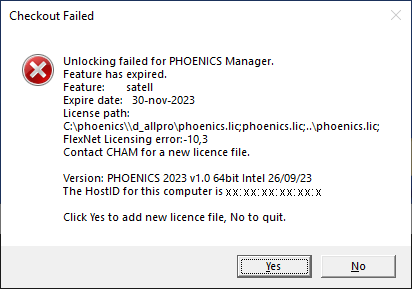
PHOENICS is provided with a temporary license file. If you received PHOENICS on a DVD disc,
then this license file should provide up to two months usage before expiry. However, if you
received PHOENICS as a download then you are likely to receive a dialog message that the code
has expired.
If you get the expired notice, then refer to Appendix A and contact CHAM for a new license
file. The HostID required by CHAM for unlocking should match that displayed in your
expired dialog message.
4.2 Test run
Once you have valid license file you can prepare a test run of the solver. For this is
best to select a simple case from the PHOENICS library cases, a good example to use is library
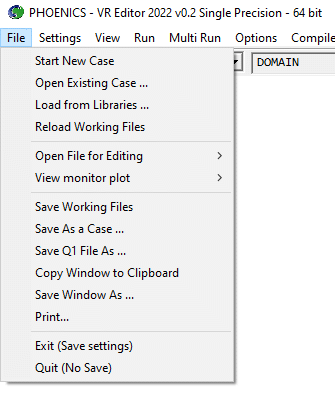
case 805 – 'Sphere in a uniform stream'. To load the library case, from the File menu in
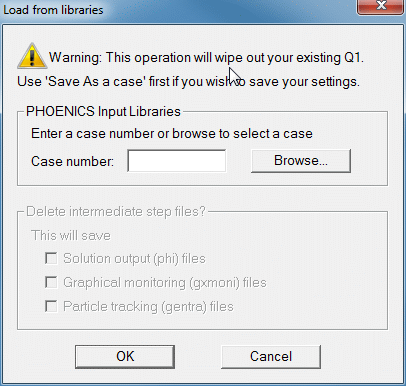
PHOENICS VR select the item 'Load from Libraries...'. This should lead to the dialog shown
below.
This dialog acts as a warning that if you had a pre-existing case loaded into the VR-Editor then the
following action(s) will overwrite your case. In the edit box to the right of 'Case number:' enter the
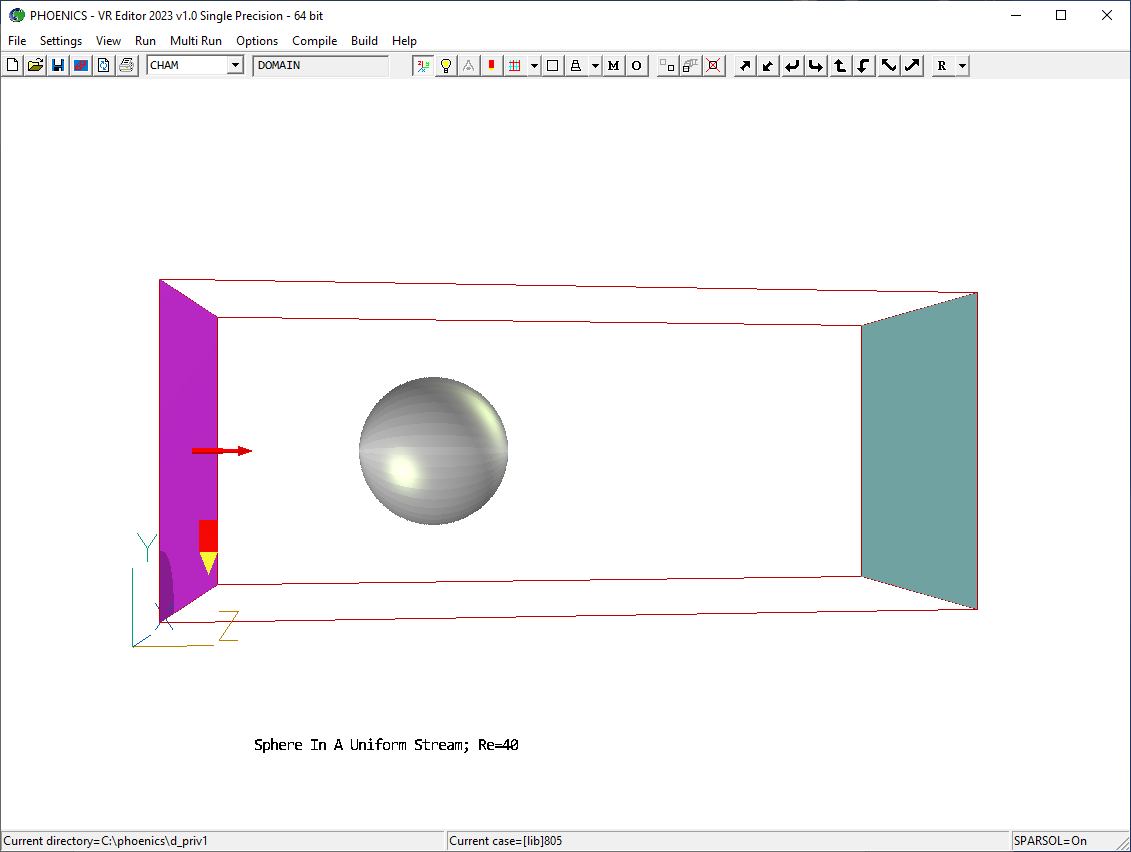
number 805, and then click on the button 'OK'. The PHOENICS VR window should then look like
This is a simple case of airflow entering the domain from an inlet on the left and passing a
sphere set in the flow field, the air exits through an outlet on the right. One can make
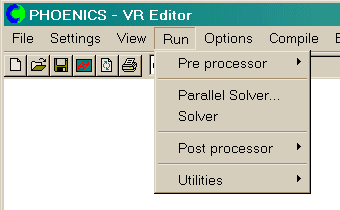
adjustments to the flow, but for this initial test run, run the model as is. On the Run menu,
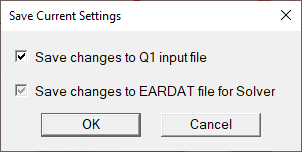
select the item 'Solver'. Once selected, you will see the 'Save Current Settings' dialog
below.
At this point you can choose whether any changes are saved to the current Q1 input file,
by default this item will be ticked. This option is provided for those occasions when you wish
to retain the original Q1. The file eardat will always be written at this time as it contains
the input instructions for the solver. Clicking on the ‘OK’ button will launch the solver,
'Cancel' will abort the run. This run should only take a few seconds and you will see a new
window appear on screen as below.
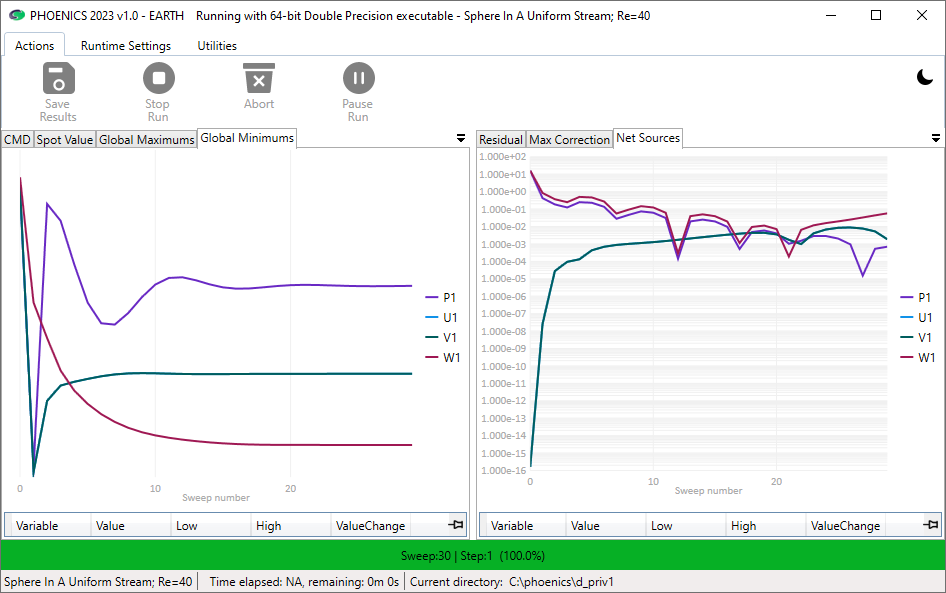
If the window does not appear then it indicates that the solver failed to start. If the solver did
not start likely causes are either an unlocking failure or a failure to locate the necessary DLLs.
Any failure in the unlocking should be recorded in the file ‘lunit6’ which will be located in the
working directory (the default location this file should be c:\phoenics\d_priv1\lunit6).
Any necessary DLLs should have been installed during the installation, but should you receive a message
indicating that one is absent make a note of it and contact CHAM for further assistance.
As the PHOENICS solver (earexe.exe) is compiled with MSMPI libraries a Windows Firewall Security Alert
will be issued when the solver is first run as shown below.
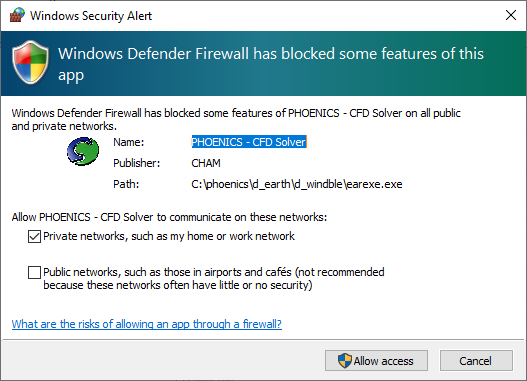
While it should only necessary to allow earexe.exe through the Firewall if running the solver in
parallel mode across a cluster, it may be more convenient to do so if one intends to run the parallel
solver in future.
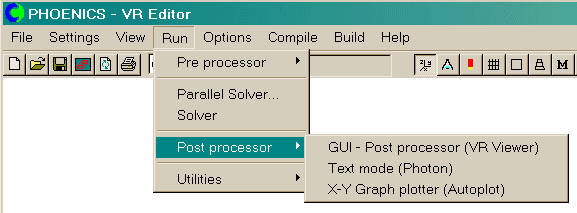
Once the solver has finished the test is now complete. You may go on to view the results in
the post processor.
Use the option 'GUI – Post processor (VR Viewer)' then click OK on the following dialog.
Instructions on the use of the VR Viewer are available in documents
TR324 and TR326.
5 Starting to use PHOENICS
PHOENICS is a general-purpose software package which uses the techniques of CFD (i.e.
Computational Fluid Dynamics) to predict quantitatively:
- how fluids (air, water, steam, oil, blood, etc) flow in and around:
- engines,
- process equipment,
- buildings,
- human beings,
- lakes, river and oceans,
- and so on;
- what are the associated changes of temperature and of chemical and physical composition;
- what are the associated stresses in the immersed or surrounding solids.
Its name is an acronym for Parabolic Hyperbolic Or Elliptic Numerical Integration Code Series,
wherein "parabolic", "hyperbolic" and "elliptic" are the words which mathematicians use to distinguish
the underlying equations. However, the mention of equations does not imply that PHOENICS is intended
for mathematicians.
PHOENICS performs three main functions:
- problem definition (i.e. pre-processing), in which the user prescribes the situation to
be simulated and the questions which are to be answered;
- simulation (i.e. data-processing), by means of computation, of what the laws of science
imply in the prescribed circumstances;
- presentation (i.e. post-processing) of the results of the computation, by way of graphical
displays, tables of numbers, and other means.
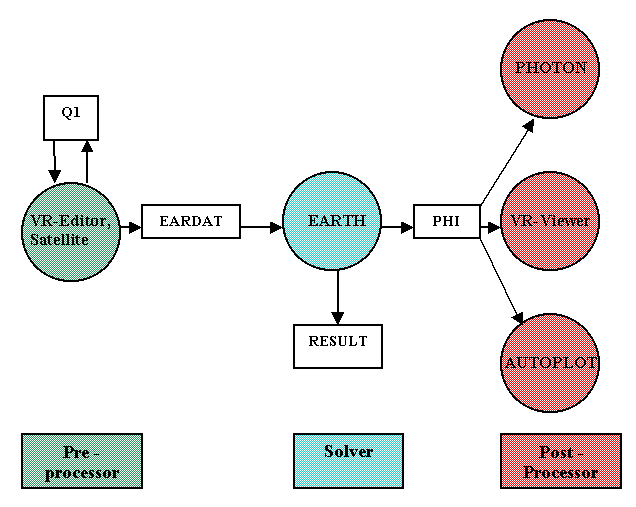
PHOENICS therefore, like many but not all CFD codes, has a distinct software module, or set of
modules, for each of the above three functions. Their interrelationships are shown below.
The four names in white rectangular boxes in the above diagram refer to files which are used for
communication between modules, as follows:
- Q1, the user-readable input-data file, which is written in PIL, the PHOENICS Input Language,
and is the main expression of what the user wishes to achieve.
- EARDAT, an ASCII file which expresses in EARTH-understandable form what the user has
prescribed by way of Q1.
- PHI(DA), which is written by EARTH in accordance with a format which enables PHOTON, AUTOPLOT
and the Viewer to display the results of the computation graphically.
- RESULT, which is an ASCII file expressing the results in tabular and line-printer-plot
form.
5.2 Pre-processing modules
The principal input file used by the PHOENICS pre-processor is the Q1 file. This is an ASCII text
file that contains a description of the scenario that is to be simulated and is written in the
PHOENICS Input Language. This Q1 is read and processed by the pre-processor module Satellite into
a form that is ready for the solver module Earth.
There are a number of ways in which the user can write a Q1, these include
- Using the Satellite GUI, the VR Editor build a representation of
the computational domain
- Write the Q1 directly in a text editor. The recommended editor is
pQ1ed which is supplied with PHOENICS,
alternatively one can use any convenient editor for example notepad.
- Write the Q1 within the Command mode of Satellite.
5.3 Post-processing modules
In addition to the VR-Viewer, PHOENICS has further modules for the graphical display of flow fields. Two of which are:
Both programs can be launched from the 'Run module' page in the VR Environment.
PHOTON(PHOENICS OuTput optiON) dates from the early years of PHOENICS; it is a still the module
which some users prefer to use.
WinPHOTON came into existence more recently. As its name suggests, its main role is to enable
users to do by way of Windows-style mouse-clicks and dialog boxes what most users of PHOTON do by
entering typed. WinPHOTON can also accept typed commands; but, as well as having a more-modern-looking
menu system, it also has several functions which PHOTON, and indeed even the VR-Viewer, does not
possess. Among these are:
- enabling users to display new variables, derived from the usual ones by way of interactively
supplied formulae;
- tabulating numerical values of user-selected variables at user-selected locations;
- permitting users to declare and use integer, real or character variables for use in macros,
i.e. the so-called 'use' files which contain a succession of PHOTON commands.
The PHOTON/WinPHOTON programs also contain an additional line plotting module
AUTOPLOT. AUTOPLOT
provides X-Y graphs, made up of straight line segments joining the data points.
The data can be manipulated in a number of ways during plotting, specifically by:
- adding or subtracting a constant
- multiplying or dividing by a constant
- raising to a power
- taking base 10 or natural logarithms
- constructing new data elements can be constructed by operating on existing elements.
AUTOPLOT can access data from PHOENICS PHIDA and XYZDA files, and also from user-created files.
It can plot data from many files simultaneously, allowing easy comparison of PHOENICS results with
experimental or analytical results.
5.4 Additional post processing options
As well as the post-processing modules which are available within PHOENICS, the user can select
additional output which will enable users to plot their results user third party graphics programs.
There are output options available for Tecplot, FieldView and VTK formats and can be activated either
through the Additional Interfaces option in
the VR Editor or by adding the PIL lines to the Q1 before running the solver.
For further detailed information access the
PHOENICS On-Line-Information System.
6 Parallel PHOENICS
6.1 Introduction
This chapter describes the installation of MPI for the user who purchased a licence for running
Parallel PHOENICS on machines that are running Microsoft Windows or Microsoft Windows Server.
Typically users switch to using the parallel PHOENICS solver for their larger cases in order to
get to a converged solution quicker.
All new computers now come with multiple core processors, some laptops may only have two cores,
but most desktops computers will now have four or more cores. This enables users to often run
parallel PHOENICS entirely on their own desktop thus eliminating the complications of setting up
a computing cluster.
6.2 Preliminary Considerations
PHOENICS 2025 uses Microsoft MPI (MSMPI) as its message passing interface for parallel computations,
in place of MPICH2 which was used with PHOENICS 2018 and earlier. Microsoft MPI is now installed
as a pre-requisite for all users of PHOENICS whether they are licensed to run the solver in parallel
or not. Failure to install MSMPI will result an errors regarding missing DLL msmpi.dll when the
solver is run.
When executing a parallel job entirely on a local machine then with Microsoft MPI it is not
necessary for SMPD to be running prior to starting a job. When the parallel job is launched with
MPIEXEC it will start the SMPD process at the beginning of the run and terminate it at the end.
6.2.1 Switch from MPICH2 to MSMPI
The change from MPICH2 to MSMPI was necessitated as it was no longer possible to install MPICH2
on new machines. MPICH2 was built at the time of .Net version 2 and still looks for .Net in the
old location, consequently it doesn’t recognise that a later version is installed. CHAM switched
to MSMPI as it is the official successor of MPICH2 on Windows systems.
There is a setting for MPI included in the CHAM.INI file, this informs PHOENICS VR which version of MPI
to set the user path for. The correct settings in CHAM.INI should be
[Earth]
MAXFCT  =  10000
MPI     =  msmpi
NPROCS  =  4
6.2.2 Computers with multi-core processors
As the installation process for PHOENICS now includes the installation Microsoft MPI as a pre-requisite,
running the PHOENICS solver in parallel should work ‘out of the box’ as one does not need to be concerned
with firewalls nor with any network connectivity issues.
6.2.2 Computers on a Cluster
While it is still possible to set up a group of computers to perform as a temporary cluster with Microsoft
MPI it is not generally recommended. The preferred method is to set up an HPC cluster with Microsoft HPC Pack.
For an overview of setting up a cluster see
https://docs.microsoft.com/en-us/powershell/high-performance-computing/overview?view=hpc16-ps
6.3 Installation of Microsoft MPI
Microsoft MPI should be installed as one of the pre-requisites prior to installing PHOENICS 2025, but
should you need to install a copy onto a compute node there is a copy in the folder
C:\phoenics\ThirdPartySoftware\Microsoft MPI 10.0, alternatively one may download it from
https://www.microsoft.com/en-us/download/details.aspx?id=105289.
To install, copy the installer msmpisetup.exe to a folder on the compute node and run the installer.
In most cases it will suffice to give the default answer on all the installer dialog questions.
A full PHOENICS installation need only be made on one machine in a parallel cluster (the head node from
which jobs will be run); however it is recommended that an installation is made on each computer.
If PHOENICS is only installed on the head node then it will be necessary to share the \phoenics directory
so that all computers may see it. Each machine in the cluster will also be required to have a valid
local licence file ‘phoenics.lic’ accessible.
6.4 Windows Firewall settings
As the PHOENICS solver (earexe.exe) is compiled with MSMPI libraries a Windows Firewall Security Alert
will be issued when it is first run. While it should only become necessary to allow earexe.exe through
the Firewall if running across a cluster, it may be more convenient to do so if one intends to run the
parallel solver.
When running in parallel mode across a cluster the Firewall must also allow communication with the Process
Manager (smpd.exe) and the Process launcher (mpiexec.exe). The Firewall settings for these two processes
should have been enabled during the installation of Microsoft MPI. If you intend to run the parallel solver
over a cluster it is essential that all three programs (earexe.exe, smpd.exe and mpiexec.exe) are
unblocked/allowed access on all the machines in the cluster.
On Windows, type Control Panel in the search box on the task bar to open the app, and then click on 'System and Security'.
In the section 'Windows Firewall' there should be an item 'Allow an app through Windows Firewall'.
This will open a dialog from which you can check the permitted programs and allow you to add the
additional programs. Click on the 'Allow another program…' button and then use 'Browse…' for the
each following three programs in turn.
C:\Phoenics\d_earth\d_win64\earexe.exe
C:\Program Files\Microsoft MPI\bin\smpd.exe
C:\Program Files\Microsoft MPI\bin\mpiexec.exe
When adding the programs you can use the ‘Network location types…’ button to restrict network
locations to ‘Domain’ and ‘Home/Work’. The ‘Public’ network option should
remain unticked.
On each of the compute nodes you will need to add the programs
C:\Phoenics\d_earth\d_win64\earexe.exe
C:\Program Files\Microsoft MPI\bin\smpd.exe
Users of other personal firewall will need to unblock the above programs in a manner suitable
for their firewall software.
6.5 Running Parallel PHOENICS
6.5.1 Running the standard parallel Earth
The simplest way to launch parallel EARTH is from the VR-Editor, although it can be run from a
Command Prompt window.
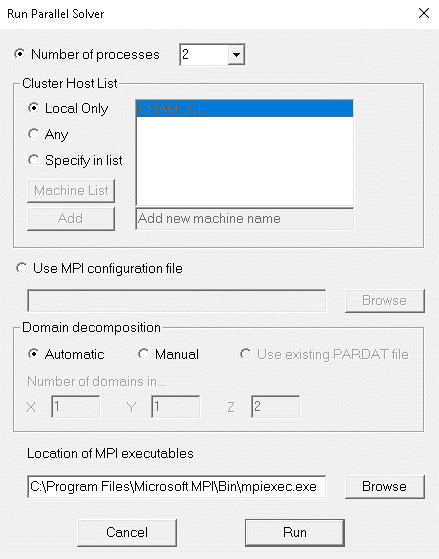
If a parallel PHOENICS licence has been purchased, an additional sub-menu, 'Parallel Solver', will
appear under the 'Run' menu option in the VR-Editor. Once the parallel solver is chosen, a dialog box
will appear on the screen where the user can either specify the number of processes to use or to
specify a MPI configuration file.
The pulldown combo box provides the user with an option to select up to 64 processes in steps of 2.
Those users who have more than 64 processors on their PC cluster may type the appropriate number into
the box.
The Cluster Host List portion of the dialog enables the user to select which hosts in the cluster
are used for computation. Here there are three options,
- Local Only: the default, will just use cores on the local machine (ie that on
which the instance of VR-Editor is running).
- Any: will use a computer assigned distribution of processes on the nodes in
the cluster. These must have been previously identified in the cluster.
- Specify in list: users may select hosts from the scroll list. By default this
list should contain those hosts previously idenified in the cluster, but one can also add to the list
by using the 'Add' button. Alternatively, one can supply a 'Machine List' file which contains a list
of those workstations from which to select. This file is simply a text file with name of the
workstations each on a separate line.
This mode of running the parallel solver will always launch the root process on the local machine
and a convergence monitoring window will appear on screen (as per the sequential solver). If running
across a cluster, then the run will attempt to launch an instance of the solver from the same location
on each of the compute nodes. If the default locations are used, this will be
C:\phoenics\d_earth\d_win64\earexe.exe. If a Private Earth is to be used, then this also should be
copied to the equivalent directory for each of the compute nodes.
When running across a cluster, it is important to consider the working directory on the compute
nodes. This is because, by default, mpiexec will attempt to launch the process in the equivalent
directory on all the workstations. So, if on the head node you are working in
c:\phoenics\myprojects\projectbeta then this directory should also appear on all the workstations
in the cluster otherwise the run will fail.
As it can difficult to always remember to create the working directory on all the cluster
workstations there is an alternative. One can set up an environment variable PHOE_WORK_DIR on each
of the cluster to point to an existing fixed directory
e.g. PHOE_WORK_DIR=C:\phoenics\mypar_runs
Then all processes (aside from the launching process) will write their output to this location.
PLEASE NOTE: The use of PHOE_WORK_DIR is not recommended if you are likely to
make multiple parallel runs simultaneously. This is because the second parallel run (and subsequent runs)
will overwrite the working files of the first.
The above methods of launching the parallel solver do not allow the user to fix the number of
solver instances on each workstation. If you want that level of control, then the user will need to
use the MPI Configuration file (see section 6.5.2 below).
6.5.2 Running parallel solver through HPC Cluster Manager
To run the parallel solver across the HPC cluster it is best to submit the job via the Cluster
Manager. In the following scenario it will be assumed that the head node computer is called
PHOE-HEAD1. It will be further assumed that PHOENICS has been installed in C:\phoenics
(shared as \phoenics) and that the user case files will be in the directory
C:\phoenicsData\myCase1 (where c:\phoenicsData is shared as \phoenicsData).
- Set up the case using the VR Editor on the head node, Save Working files and/or Exit
making sure to 'Save changes to EARDAT file for Solver'.
- In HPC Cluster Manager, in the Actions pane, click New Job.
- In the left pane of the New Job dialog box, click Edit Tasks.
- Point to the Add button, click the down arrow, then click Basic Task.
- In the task dialog box, type a name for your task.
- Type the task command in the Command line entry box.
mpiexec //phoe-head1/phoenics/d_earth/d_win64/earexe.exe
- Specify the Working directory for your task. In general, a working directory should be indicated with a
Universal Naming Convention (UNC) path, not a relative or a local path. In our example it will be
//phoe-head1/phoenicsData/myCase1
- Specify the Standard input, Standard output, and Standard error file names relative to the working directory.
- Set the minimum and maximum number of cores necessary for your job.
- Click OK to add the task to your job. The new task now appears in the list of tasks for your job.
6.5.3 Monitoring the solution of jobs running on the cluster
Parallel runs submitted onto the cluster run in batch mode, and this mode does not permit the interactive
viewing of the solver GUI. However, it is still possible to view the progress of the solution through the
use of the file snapshot, best used in combination with the file monicurr. The file monicurr is an optional
file written by the solver to provide the current monitoring settings. It is turned on by the following
setting in the file cham.ini
[Earth]
Monicurr  = on
This file contains the current monitoring cell and relaxation parameters for the solved variables and
number of sweeps. To obtain a snapshot of the current state of the solution one need just copy (or rename)
the file monicurr to a file called snapshot, the solver will then read the snapshot file and generate a
GXMONI monitor plot. The file snapshot will then be deleted and a new monicurr file generated. Here is an
example of the contents of a monicurr file:
   Start of monitor location
IX =    112
IY =     67
IZ =      5
NX =    200
NY =    200
NZ =     47
  End of monitor location
LSTEP =          1
LSWEEP =       3000
  Start of relaxations
SARAH =   0.000
P1   =  -1.000
U1   =  0.1000
V1   =  0.1000
W1   =  0.1000
KE   = -0.3000
EP   = -0.3000
PRPS =  -1.000
EPKE =  -1.000
DEN1 =  -1.000
EL1  = -0.2500
ENUT = -0.2500
  End of relaxations
If changes are made to the contents of monicurr (e.g. a change in monitor location or
number of sweeps) before being copied to snapshot then these values will be updated in
the solver and used for subsequent computations.
It is also possible to cause the current solution to terminate early by creating a file
called stopjob. This will signal the solver to stop after the current sweep, write the
results to file and terminate cleanly.
6.5.4 Automatic domain decomposition
When using the default automatic domain decomposition, parallel PHOENICS only differs from
sequential when Earth is run: problem set-up and post-processing of results can be done in exactly the
same way as for the sequential version. A case that has been run in sequential mode can normally be run in
parallel without any changes being made. The output from a parallel PHOENICS simulation will be result
and phi files, having the same format as for sequential simulations.
6.5.5 User-specified sub-domains
It is also possible to by-pass the automatic domain decomposition algorithm, and to specify how
you want to decompose the calculation domain into sub-domains. This can be done by selecting 'Manual'
in the Domain decomposition group box on the Run Parallel solver dialog
(see section 6.5.1 above).
When you first switch to manual decomposition the arrangement will match the automatic decomposition
that would otherwise be used. Normally automatic decomposition will suffice, but there may be occasions
where a different decomposition is preferable to avoid a split at a critical location.
6.5.6 Command mode operation
In a Command Prompt window, if the EARTH executable is launched directly, then the sequential solver
will be used; to run the parallel solver, the program name 'earexe' is used as an argument to mpiexec.
A script RUNPAR.BAT [nnodes] is provided. The optional argument [nnodes] indicates the number
of processes to be launched on the current PC. The default is to launch two processes.
For example, RUNPAR 2 will execute the MPI command:
mpiexec -np 2 \phoenics\d_earth\d_win64\earexe
If a cluster has been defined by smpd, then the command will execute on two processors in the
cluster, otherwise it will launch multiple processes on the local machine.
There are also 'run' commands which can be used in conjunction with configuration files, for
example 'runcl4' uses the configuration file 'config4'. Config4 lists the PCs and processors to be
used (see above Configuration file section above). The script runcl4 will execute the following command:
mpiexec –configfile \phoenics\d_utils\d_win64\config4
6.5.7 Testing Parallel PHOENICS
The parallel installation should be tested by loading a library case.
The different solver used for parallel operation requires a slight modification to the numerical
controls. For example, the user may use main 'Menu' in the VR-Editor, and select 'Numerics' and then
'Iteration control': change the number of iterations for TEM1 (temperature) from 20 to 300.
(Increasing the relaxation for the velocity components, U1 and W1, from 1.0 to 10.0 will also improve
performance.)
For parallel operation it is recommended that velocities should be solved whole-field (rather
than slab-by-slab); this can be achieved from the VR Editor (under 'Models', 'Solution control/extra
variables') or by direct editing of the q1 file (by setting 'Y' as the third logical in a SOLUTN
command).
6.6 Further Information
For further information on Microsoft MPI see their web page,
https://docs.microsoft.com/en-us/message-passing-interface/microsoft-mpi.
6.7 Parallel Troubleshooting
6.7.1 Incorrect MPI setting in CHAM.INI
If the parallel solver fails on start up from PHOENICS VR it may be that there is the wrong MPI
setting in the CHAM.INI file. The error message may be similar to..
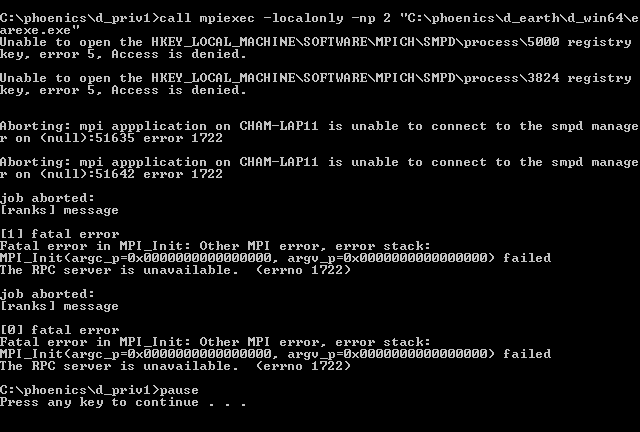
There are several markers here that indicate that it is trying to launch the parallel solver using
the MPICH2 method, the first is the -localonly flag in the command line. This is only available in
MPICH2, the second is the registry key errors, these again will only be seen with MPICH2.
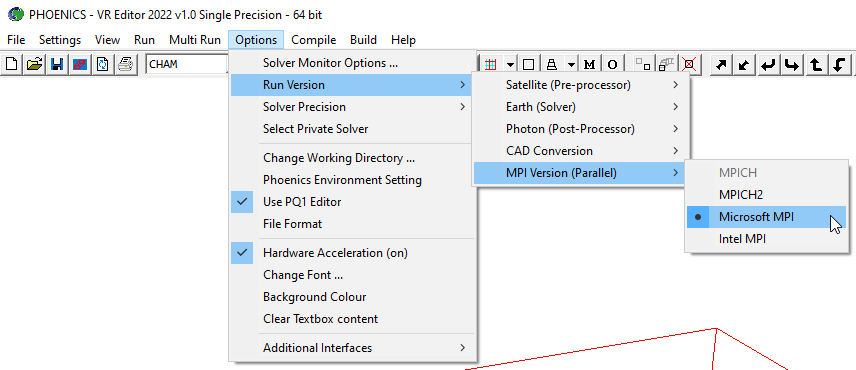
The MPI setting may be checked or reset via the Options menu in PHOENICS VR; for PHOENICS 2025 it
should be set to Microsoft MPI.
The correct settings in CHAM.INI should be
[Earth]
MAXFCT  =  10000
MPI     =  msmpi
NPROCS  =  4
It may be necessary to update this setting in local cham.ini files for cases brought forward from
earlier versions of PHOENICS.
6.7.2 Difficulty locating hosts
If the head node has difficulty seeing one or more of the compute nodes and you are using static
IP addresses in your cluster then you should consider defining the IP addresses in the host
file on each of the workstations. The host file is normally located as
C:\Windows\system32\drivers\etc\hosts
An example 'hosts' file is:
# Copyright (c) 1993-2009 Microsoft Corp.
#
# This is a sample HOSTS file used by Microsoft TCP/IP for Windows.
#
# This file contains the mappings of IP addresses to host names. Each
# entry should be kept on an individual line. The IP address should
# be placed in the first column followed by the corresponding host name.
# The IP address and the host name should be separated by at least one
# space.
#
# Additionally, comments (such as these) may be inserted on individual
# lines or following the machine name denoted by a '#' symbol.
#
# For example:
#
#   102.54.94.97  rhino.acme.com # source server
#    38.25.63.10  x.acme.com     # x client host

127.0.0.1 localhost
192.168.11.1 cham-cfd1
192.168.11.2 cham-cfd2
192.168.11.3 cham-cfd3
192.168.11.4 cham-cfd4
To determine the IP addresses, on each of the workstations in the cluster open a Command Prompt window and
type the command ipconfig. Use the IPv4 Address located in the section
Ethernet adapter Local Area Connection to define the IP address for the workstation in the hosts file.
6.7.3 Incorrect unlocking on one of the compute nodes
If when starting the parallel solver you find that it has stalled during the start up process, that is if
there are earexe.exe processes visible on all the compute nodes but consuming no CPU, then it may be a case
of one of the compute nodes not being correctly unlocked. If this happens you will need to check the
installations on each of the nodes separately to determine which has not been unlocked correctly.
6.7.4 Firewall blocking on one of the compute nodes
If one of the compute nodes has not had the Firewall setting made correctly then the program mpiexec.exe
should appear in the task manager of the head node, but earexe.exe will not appear in the list of processes
on the compute node. It will appear to stall but will eventually time out with a message:
Error while connecting to host, a connection attempt failed because the connected party did not properly
respond after a period of time, or established connection failed because connected host has failed to respond. (10060)
Connect on sock (host=cham-cfd2, port: 8676) failed, exhausted all end points unable to post a connect to start the connect command
Sock error: Error=-1
Abort: Unable to connect to ‘cham-cfd2:8676’
Sock error: Error=-1
If this message occurs then check the firewall settings on host cham-cfd2 and ensure that the programs
smpd.exe and earexe.exe have been allowed access (see 6.4 for detail).
Appendix A. Unlocking PHOENICS
FLEXlm
PHOENICS is normally unlocked using the FLEXlm system, and the delivery CDROM
contains a FLEXlm licence file which allows use of PHOENICS for an initial period of one
month.
If you receive a dialog message that the code has expired.
The HostID required by CHAM for unlocking should match that displayed in your expired dialog
message. Alternatively when run, the batch file /phoenics/d_allpro/get_hostid.bat will create a
text file lmhostid.txt, which contains the FLEXlm HOSTID of that PC. Alternatively, the program
/phoenics/d_allpro/lmhostid.exe, when run in a Command Prompt window, displays the required FLEXlm HOSTID.
This HOSTID should be sent to CHAM's Installation Section (see Contacting CHAM details below)
in order to obtain a longterm licence file. The FLEXlm licence file 'phoenics.lic' supplied by
CHAM in response to such a request should be placed in /phoenics/d_allpro, and the existing
phoenics.lic file deleted.
USB dongle
A USB dongle may be supplied with the delivery, and the unique USB FLEXID will normally
be known by CHAM. This FLEXID is printed on the USB dongle itself, and is of the form 9-abcd1234.
When requesting a FLEXlm licence file the FLEXID value should be sent to
CHAM's Installation Section (see Contacting CHAM details below).
Parallel
PHOENICS is unlocked using the FLEXlm system, and the delivery CDROM contains a
FLEXlm licence file which allows use of Parallel PHOENICS for an initial period of two
months.
The FLEXlm HOSTID can be obtained as detailed under the paragraph ‘FLEXlm’ above.
Unlocking for a multi-processor machine is exactly the same whether parallel or sequential
PHOENICS is being used on that PC.
For a Parallel cluster installation the HOSTID of all the machines in the cluster is required
(because, although PHOENICS need only be installed on one machine, parallel Earth will run
on each machine). This is the case for multi-processor installations and clusters of fewer
than 16 nodes - alternative unlocking will be arranged for larger clusters.
SimLab
SimLab is an optional third party add-on which may be used to convert a variety of CAD formats
into ones usable by PHOENICS. See the chapter Importing CAD Data
in the VR user guide for more details. SimLab can be obtained directly from CHAM
Contacting CHAM
The FLEXlm HOSTID or USB FLEXID should be recorded on the unlocking request form
provided and returned to:
| Installation Section |
Tel: 020 8947 7651 |
| CHAM, | e-mail: installations@cham.co.uk |
| Bakery House | |
| 40 High Street, |
| Wimbledon |
| London SW19 5AU |
Appendix B. Frequently Asked Questions and Troubleshooting
B.1 FAQ
1. What is the PHOENICS directory structure ?
A brief description of the first level subdirectories under \phoenics is given
below.
d_allpro contains the binary code for the PHOENICS service routines shared by
SATELLITE and EARTH, the program libraries for all modules and the graphics drivers used
by SATELLITE, EARTH and PHOTON;
d_chmkin, containing files for the CHEMKIN interface.
d_earth contains the binary code and some source files of the PHOENICS main solver
program EARTH, together with the PHOENICS case libraries;
d_includ contains the Fortran common blocks required for recompilation;
d_intfac contains the interfaces between PHOENICS and other codes;
d_photon contains the binary code of the PHOENICS post-processor program PHOTON,
which now incorporates AUTOPLOT;
d_polis contains all files for the PHOENICS On-Line Information System;
d_priv1 is referred to as a 'private' working directory from which the
user may run all the PHOENICS programs, or use the PHOENICS-VR Environment;
d_satell contains the binary code of the PHOENICS pre-processor program SATELLITE,
and the menu libraries;
d_shapem contains the executable of Shapemaker, a geometry generator;
d_utils contains utility batch files, such as run scripts, link scripts, and
compiler option scripts. Also included are directories which contain many utility
programs.
In addition there are subfolders d_win64 and d_windble which contain the executable files
(64bit single or double precision) which correspond to the subfolder name. The PHOENICS 2025
delivery contains all the files necessary for running 64bit executables and double precision 64bit solver.
2. How do I create a working directory ?
Under Windows
A working directory, \phoenics\d_priv1, is provided with the installation. New
working directories may also be created anywhere on the system. The following steps should
be performed in order to create a working directory, such as d_work.
To create the new folder, click the right mouse button on an empty part of the Windows
desktop, then select New, and Folder. Type in a name for the new folder e.g. d_work,
then press <return>. Drag this d_work folder to any convenient location.
Start the PHOENICS-VR Environment and click on Options, Change working directory. Use
the browser to locate the new folder.
Note that the desktop icon created by the installation process is set to start PHOENICS
with \phoenics\d_priv1 as the working directory. This can be changed by bringing up
the properties dialog box for the PHOENICS icon, and changing the 'Working' directory on
the program tab. Many copies of the icon can be made, each with a different 'Working'
folder.
In a Command Prompt window
It is recommended that a new working directory is created under the \phoenics
directory although the new directory can be anywhere. To create the new working directory,
d_work,
Type: md d_work
3. What to do if the PHOENICS folder is Read-Only?
If PHOENICS has been installed by another user, or if it is located within
C:\Program Files then the user may only have Read-Only access phoenics folder.
This will make the default PHOENICS VR and PHOENICS Command Prompt icons
unworkable as they will attempt to open the program within phoenics\d_priv1. They will
fail because it will be unable to write to that directory.
If this happens then the (Computer) Administrator will need to modify the properties of the
PHOENICS-VR icon (right-click on the icon and select Properties) so that the folder pointed
to for 'Start In:' is somewhere users will have write access to.
4. How do I set or reset my PHOENICS Environment variable?
Click on the Start menu icon, then in the 'Search' edit box start typing
environment the computer should respond by offering a number of possible options
one of which should be ‘Edit environment variables for your account’, choose this one.
To create a new User variable click on 'New…' and enter PHOENICS as the variable name
and C:\phoenics as the Variable value (if your installation is not located at C:\phoenics then
enter the location of your installation). Then click 'OK' to close each of the dialogs in turn.
5. Why the PHOENICS On-line Information System (POLIS) did not run correctly ?
POLIS can be run from the PHOENICS-VR Environment, or the PHOENICS
Commander by clicking on the appropriate button under HELP in the top tool bar. It can
also be started on Windows systems from the CHAM-logo icon labelled 'POLIS' on the
Desktop.
All the POLIS documents are in HTML format, and can be accessed directly through an
Internet browser. The address of the POLIS top page is usually \phoenics\d_polis\polis.htm.
If PHOENICS is not installed at the root level (for example, if it is installed within
C:\Program Files) then although the icon will link to the opening page, the links within
the document will fail. Historically, the links in POLIS have been made with absolute paths
and so POLIS must be located at a root level for the links to work. The answer is to make use
of the subst command to map the location of the installation to the root level of a
virtual drive (see section 3.2).
6. How to configure PHOENICS to enable POLIS to run on a separate drive
Normally, the POLIS files will be copied to the drive on which PHOENICS has been
installed. The Desktop icon and Start-menu item will be set to this drive automatically by
the installation program.
The drive letter used by the HELP button is stored in the file \phoenics\d_allpro\cham.ini.
At installation time, it is set to C. If PHOENICS is installed on another drive, say D,
the cham.ini file must be edited (with Notepad or any other file editor) and the
entry 'drive = ' in the [POLIS] section must be set to the correct drive letter.
7. Why the POLIS links don’t work in Firefox
POLIS uses absolute pathnames in its HTML links; unfortunately Firefox is unable to
translate these links correctly from the file system.
The POLIS links will work correctly in Microsoft Edge, Internet Explorer and Google Chrome.
In addition to this the file permissions to the folder 'phoenics/d_utils/pq1ed'
will need to be changed so that Users have write permission, otherwise the pQ1 editor will fail.
8. Can I open a new Command Prompt window to run PHOENICS ?
PHOENICS can be run from an Command Prompt window opened by users,
using individual commands such as:
- sat (to run SATELLITE)
- vre (to run the PHOENICS-VR Environment)
- ear (to run EARTH)
- pho (to run PHOTON)
- aut (to run AUTOPLOT)
providing that the PATH for that window has been suitably modified. The batch file
\phoenics\d_utils\phoepath will modify the PATH correctly.
Users should check this file to ensure that the drive letters and paths for PHOENICS
and the Intel Visual Fortran Compiler are both correct.
9. What compiler option should I use ?
For the 64bit Intel Visual Fortran version, the PHOENICS code has been compiled using the
compiler options (using Intel OneAPI HPC Toolkit 2023)
ifort /D_X64_ /D_WDIR_ /integer-size:64 /threads /libs:static /winapp /compile-only \
/assume:byterecl /debug:none /O3 /include:\phoenics\d_includ  /include:\phoenics\d_includ\d_win64
as specified in the batch file COMPILE.BAT in the directory \phoenics\d_utils\d_win64.
B.2 Troubleshooting
Somehow the CHAM icon, PHOENICS-VR disappears from my desktop. How do I recreate this
icon.
Should the PHOENICS-VR Environment Icon be deleted in error it can be recreated thus:
Select the following by clicking, using the left button of the mouse
Start, then point to Programs
Accessories
Windows Explorer
Then, in 'All folders', double click on
Phoenics then
d_satell and then
d_win64
Finally, in the 'contents of d_win64' box, click right button of the mouse on
satexe.exe then select the option
Create Shortcut
A Shortcut to satexe.exe is now created. Drag this Shortcut, using the left mouse
button, onto a suitable part of the Windows screen. Rename the icon, using the right
button, to 'PHOENICS-VR'. Right-click on the icon, and select 'Properties' then add the
argument vre after SATEXE.EXE. Set the 'Start in' folder to a suitable location, e.g.
\phoenics\d_priv1.
When I click on the PHOENICS-VR Environment icon, I get an error message that 'Windows
cannot find C:\phoenics\d_satell\d_win64\satexe.exe'.
The desktop shortcut created by Install assumes that PHOENICS has been copied to drive C:.
If you have copied it to another drive, you will have to modify the 'Cmd line' and 'Working'
entries on the Program tab of Properties to reflect the correct drive letter. Click on the
Commander icon with the right mouse button to bring up the Properties dialog box.
I can't run any PHOENICS modules from a Command Prompt window with the 'runsat', 'runear'
commands - I get 'bad command or file name' error messages.
You should check if the path is correct by typing 'PATH' on the Command Prompt window. The
correct path should point to '\phoenics\d_utils\d_win64 and \phoenics\d_utils'.
If it does not, you must run the batch file <drive>:\phoenics\d_utils\phoepath.bat in
the Command Prompt window before running any PHOENICS modules. Check that this file contains
the correct <drive> letter for PHOENICS, and the correct path to the INTEL Fortran compiler.
My windows open and close too quickly for me to be able to see the messages.
Edit the file \phoenics\d_allpro\cham.ini ('Files', 'Open file for editing','cham.ini' from
environment top menu bar) and replace the line
pause = off
by
pause = on
My compile window opens and closes too quickly for me to be able to see the error
messages.
Edit the file \phoenics\d_utils\d_win64\compile.bat, and add /list to the argument list as
follows:
ifort /list %IFACE% %CMP_OPTS% %INT_SIZE% %IDIR% %1
You will now generate listing files for each file compiled.
The INTEL Visual Fortran compiler version does not appear to be accessible when I try
to compile a program.
In order to use the Visual Fortran compiler it must first be visible on the user’s path. PHOENICS
uses the file \phoenics\d_utils\phoepath.bat to set the users path correctly. This script depends
on the correct Environment variable being set when the Intel Visual Fortran Compiler was installed.
The script should be good for versions of the Intel compiler between 2021 and 2025. The current
Fortran compiler is contained within Intel OneAPI HPC Toolkit version 2025.
If, for some reason, you do not have the Environment variable set you can modify the file
phoepath.bat to explicitly set it. For example, if you have installed Intel OneAPI HPC Toolkit
2025 in its default location, in phoepath.bat, after the line
if defined phoenics (set pho=%phoenics%) else set pho=\phoenics
add
set IFORT_COMPILER25=C:\Program Files (x86)\Intel\oneAPI\compiler\2025.0
Check that this is where the compiler is located and adjust the location if necessary.
When I click on 'compile' from the VR Environment I encounter the error message
'Bad command'. How do I cure the problem?
This problem is usually because the path name for the script ifortvars.bat is incorrect in the file
/phoenics/d_utils/phoepath.bat. Please refer to the previous FAQ for the correct setting of the compiler
path.
If the Compiler path is set correctly then the other possibility is that the path to the PHOENICS script
is incorrect. The script PHOENICS uses for compilation is compile.bat and is normally located in
\phoenics\d_utils\d_win64. If you have installed PHOENICS somewhere other than the root directory and you
do not have the Environment variable PHOENICS set correctly then it will fail to find the script. Refer to
the FAQ 4 “How do I set or reset my PHOENICS Environment variable?”
for instructions on how to do this.
PHOENICS starts but immediately stops. When I click on the PHOENICS icon, the PHOENICS-VR
window appears and disappears almost immediately.
Check in the working directory for the file luout. If it exists, open it with Notepad or some
other file editor. It may contain an error message - usually indicating that unlocking is incorrect.
I have put PHOENICS on to a server, but could not run from another computer on my network.
You will need to have local copies of some files and directories on each machine. You will also
need to modify the config and prefix files. Please contact CHAM for detailed information.
PHOENICS has been working satisfactorily, but today it fails with a Microsoft error window
reporting an error in 'satexe'. I have made no changes since yesterday, and my computer has not been
upgraded or modified since PHOENICS last worked.
If no changes have been made on your computer it is just possible that the length of the
FLEXlm licence path list in the Registry has become too long. CHAM can supply instructions on
clearing long pathname lists in the Registry, these can be obtained on request from User Support.
I get a message indicating there is insufficient Virtual Memory when I run a PHOENICS module
The F-arrays for all the modules are now allocated dynamically at run-time, in the file CHAM.INI.
Sometimes, when running large cases, the Earth Solver will display a dialog complaining that there is
insufficient virtual memory, and give the size of the F array it is trying to allocate. In many cases
changing the CHAM.INI setting to allocate that much memory initially will allow the case to run.
Sometimes, when running large cases, the Earth Solver will display a dialog complaining that there
is insufficient virtual memory, and give the size of the F array it is trying to allocate. In many cases,
changing the CHAM.INI setting to allocate that much memory initially will allow the case to run.
When I attempt to compile from within VR Editor, an error in the Command Prompt window indicates
that the wrong compiler has been accessed
This can happen if you have more than one Fortran compiler installed. The solution is to set up an
Environment Variable PHOENICS_COMPILER with a value which is the pathname to the correct compiler
(ifort.exe). For example if you have Intel OneAPI HPC Toolkit 2025 installed the correct value
would be
C:\Program Files (x86)\Intel\oneAPI\compiler\2025.0\bin