The cases below exemplify a variety of turbulence models. The case considered involves flow over a backward-facing step at a Reynolds Number of 40,000. The choice of turbulence model can significantly affect the length of the predicted recirculation zone.
The workshop also exemplifies modification of the mesh, and the use of AUTOPLOT to compare different solutions.
The KE-EP turbulence model proposed by Harlow and Nakayama in 1968 is by far the most widely-used two-equation eddy-viscosity turbulence model, mainly because the EP was long believed to require no extra terms near walls. The popularity of the model, and its wide use and testing, has thrown light on both its capabilities and its short-comings, which are well-documented in the literature.
From the system level:
To enter the PHOENICS-VR environment, click on the PHOENICS icon on the desktop, or click on Start, programs, PHOENICS, PHOENICS.
From the commander level:
To enter the PHOENICS-VR environment, click on the 'Run vre' icon in the left column.
In PHOENICS-VR environment,
Start with an 'empty' case - click on 'File' then on 'Start New Case', then on 'Core'', then click on 'OK'; to confirm the resetting.
To enter VR Editor:
This is the default mode of operation.
Load Library case 290 and run the base case.
Click on 'File', then 'Load from Libraries'. Enter 290 in the 'case number' data entry box, and click OK.
Click on 'SATELLITE command prompt' and press 'Return' key for all the default settings until the geometry appears on the screen.
Click on 'Main menu', 'Models'.
Check if 'Solution for velocities and pressure' is ON and if the selected turbulence model is 'Standard KE' (Standard high-Reynolds number k-ε model).
Click on 'Output', and change the Monitor graph style from 'Min/Max_val' to 'Default'. Set the Monitor update frequency to 1.
Click on 'Numerics'. Set the Total number of iterations to 500.
Set the 'Global convergence criterion' to 0.01%.
Change 'Automatic Convergence Control' from Off to ON.
Click on 'Reset solution defaults'
Click on 'Previous panel', 'Top menu' and 'OK'.
Increase the number of cells in the X direction behind the step.
Click on the 'mesh toggle' button on the hand-set. The grid will now be drawn. The blue lines are 'ordinary' grid lines, the red lines are region boundaries. The grid can be modified within each region.
Click on the image of the domain, just to the right of the step, in X region 2. In the Grid mesh Settings dialog box, set Cells in region to 16 and Power/ratio to 1.3 for X in region 2.
Click OK. You should see the number of cells in X region 2 change.
Click on the image of the domain toward the right-hand end, in X region 3. In the Grid mesh Settings dialog box, set Cells in region to 16 and Power/ratio to 1.3 for X in region 3. Click OK. You should see the number of cells in X region 3 change.
The total cell number in X direction is now 36.
In the PHOENICS-VR environment, click on 'Run', 'Solver'(Earth), and click on 'OK'; to confirm running Earth.
In the PHOENICS-VR environment, click on 'Run', 'Post processor',then GUI Post processor (VR Viewer) Viewer)'. Click 'OK' on the file names dialog to accept the default files.
To view:
To select the plotting variable:
To change the direction of the plotting plane, set the slice direction to X, Y or Z
![]()
To change the position of the plotting plane, move the probe using the probe position buttons
 .
.
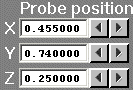
The following picture shows the velocity vectors
 .
.
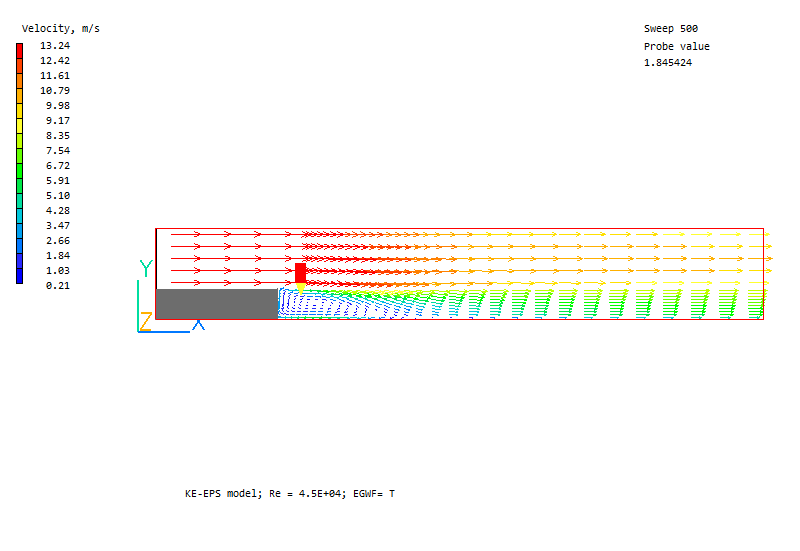
The following picture shows the contours of turbulent viscosity.
 .
.
In particular, look at the length of the recirculation zone and the contours of turbulent viscosity, ENUT.
In the PHOENICS-VR environment, click on 'Save as a case', make a new folder called 'TURBUL', select the new folder, and save as 'KE'.
The RNG model is a variant of K-ε based on ReNormalisation Group theory. It uses different constants, and has an addition term in the ε equation. The effect of the changes is to reduce the turbulent viscosity in regions of high shear - e.g. in recirculation zones. Hence it should predict a longer recirculation zone, in agreement with experimental evidence.
Click on 'Run - Pre processor - GUI Pre processor (VR-Editor)' to return to the Editor.
Change the turbulence model to RNG.
Click on 'Main menu', 'Models'.
Click on 'Standard KE' next to Turbulence models. From the list of models, select 'KE variants' and click 'OK'.
Select 'RNG KE' and click 'OK'.
Click on 'Top menu', 'OK'.
In the PHOENICS-VR environment, click on 'Run', 'Solver', and click on 'OK'; to confirm running Earth.
In the PHOENICS-VR environment, click on 'Run' then 'VR Viewer', and view the velocity vectors, contours and isosurfaces.
In the PHOENICS-VR environment, click on 'Save as a case', select the folder 'TURBUL' and save as 'RNG'.
The CHEN-KIM model is a variant of K-ε based on comparison with experimental data. It uses different constants, and has an addition term in the ε equation. The effect of the changes is to reduce the turbulent viscosity in regions of high shear - e.g. in recirculation zones. Hence it should predict a longer recirculation zone, in agreement with experimental evidence.
Click on 'Run - Pre processor - GUI Pre processor (VR-Editor)' to return to the Editor.
Change the turbulence model to CHEN-KIM.
Click on 'Main menu', 'Models'.
Click on 'KERNG' next to Turbulence models. From the list of models, select KE variants and click 'OK'
Click KECHEN and click 'OK'.
Click on 'Top menu', 'OK'.
In the PHOENICS-VR environment, click on 'Run', 'Solver', and click on 'OK' to confirm running Earth.
In the PHOENICS-VR environment, click on 'Run', 'Post processor',then GUI Post processor (VR Viewer) Viewer)', and view the velocity vectors, contours and isosurfaces.
In the PHOENICS-VR environment, click on 'Save as a case', select the folder 'TURBUL' and save as 'CHEN'.
AUTOPLOT is a 2D graph-plotting program. It will read a PHOENICS PHI file, and plot any variable against any coordinate, at a given location.
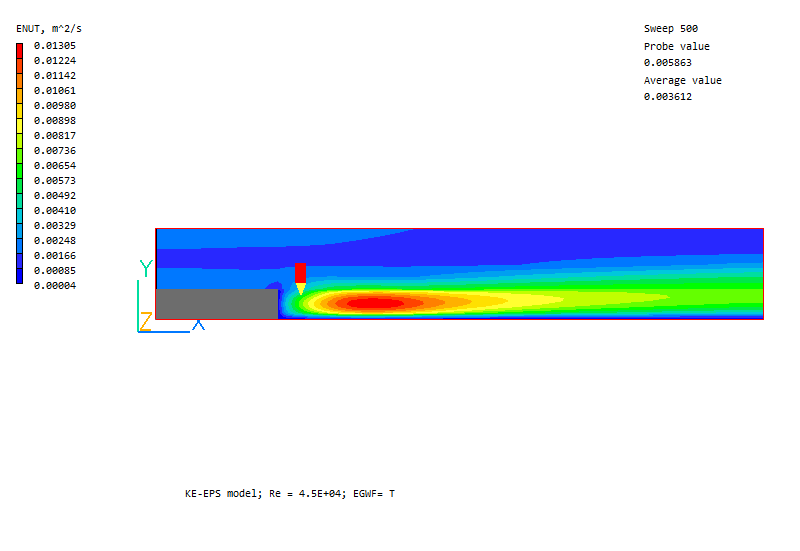
In this case, we will compare the results of the three turbulence models by plotting the X-directed velocity, U1, along the floor of the duct (IY=1). The point at which U1 is zero is the attachment point.
Accessing AUTOPLOT
In the PHOENICS-VR Environment, click on 'Run', 'Post processor' then 'X-Y Graph plotter (AUTOPLOT)'.
Attaching the data files.
To tell AUTOPLOT which files are to be plotted, enter the command
FILES
Enter the name of the first file as TURBUL/KE.PDA and press RETURN. AUTOPLOT will ask for the file type. Enter 3 (for direct-access PHIDA file) and press RETURN. Now enter the name of the second file, TURBUL/RNG.PDA and press RETURN. Finally, enter the last file name, TURBUL/CHEN.PDA and press RETURN twice to signal the end of file attachment.
Reading the data
We must now read data from the attached files into AUTOPLOT. We want to plot U1 as the Y axis, X distance as the X axis. We want to pick up the U1 values along the floor, that is in the first row of cells at IY=1.
The command to read this data from the first file (KE.PHI) is:
DATA 1 U1 Y 1
The command to read this data from the second file (RNG.PHI) is:
DATA 2 U1 Y 1
The command to read this data from the third file (CHEN.PHI) is:
DATA 3 U1 Y 1
Each time a DATA command is executed, AUTOPLOT reads the specified values from the specified file, and creates a 'data element' in memory.
Plotting the data
The command to plot individual data elements is PLOT n, where n is the number of the data element. PLOT will draw the data in the default colour and linestyle, which is a solid white line.
An alternative means of drawing data elements is the COLj n command. Here n is the element number to be drawn, and j is a colour number to use. The available colour 'numbers' are 0 - 9 and A - F. Colour 0 is black, 1 is white, 2 is dark blue and F is red.
To draw the data from KE.PHI in white, RNG.PHI in light blue and CHEN.PHI in red, enter the commands:
PLOT 1
COL4 2
COLF 3
At this point, the screen should look like:
It is clear that both RNG and CHEN-KIM predict a longer recirculation zone than the standard model. This is to be expected, as both produce lower turbulent viscosity within the recirculation zone.
If you have time, you might like to try the effect of refining the grid further. (You might need more sweeps to ensure convergence).
Alternatively, you may wish to try the effect of using a higher-order differencing scheme, or one of the other turbulence models.
In the VR Editor click on Main Menu / Numerics / Differencing Schemes.
Click on Set schemes individually and set:
Click on Previous panel/Relaxation control and set the values for U1 and V1 to 1.0E-3.
Click on Previous Panel/Top/OK.
Run Earth, and compare the results with those you already have.