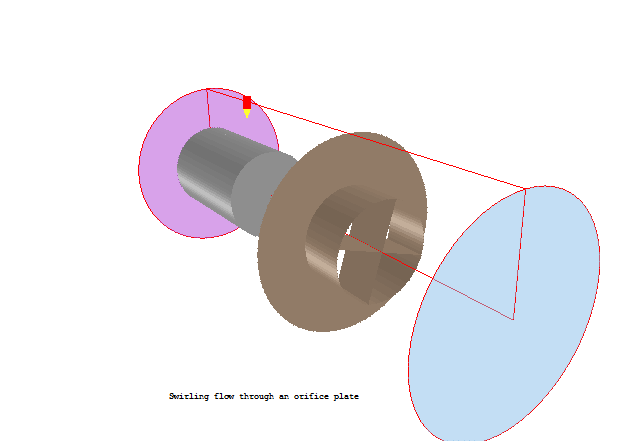
This example shows how to set up and run the simulation of a swirling flow through an orifice plate using VR in cylindrical-polar coordinates.
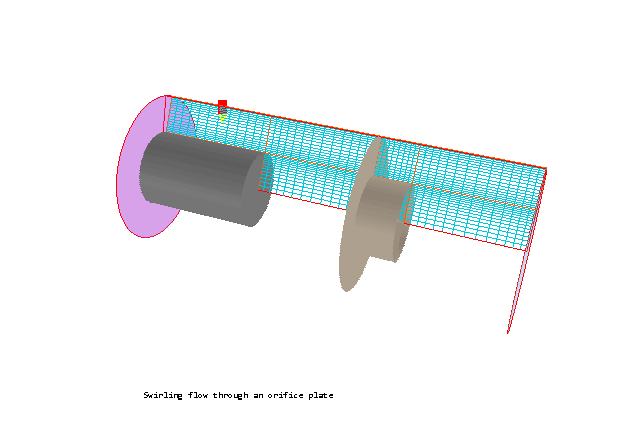
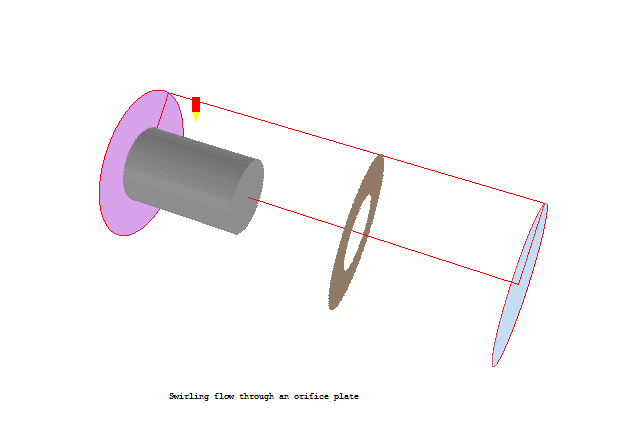
The flow is three-dimensional and its geometry is shown below. Velocity and pressure will be solved. Cyclic boundary conditions are used to allow the flow to swirl.
At the inlet, the flow velocity is 1 m/s axially, swirling at 20 radians/s.
As a second exercise, a flow-straightener is introduced down-stream of the orifice in order to remove the swirl component.
From the system level:
To enter the PHOENICS-VR environment, click on the PHOENICS icon on the desktop, or click on Start, programs, PHOENICS, PHOENICS.
From the commander level:
To enter the PHOENICS-VR environment, click on the 'Run vre' icon in the left column.
In PHOENICS-VR environment,
Start with an 'empty' case - click on 'File' then on 'Start New Case', then on 'Core', then click on 'OK'; to confirm the resetting.
To enter VR Editor:
This is the default mode of operation.
Set the domain size, and activate solution of variables:
Click on 'Main Menu' and set 'Swirling Flow Through an Orifice Plate' as the Title.
Click on 'Geometry'.
Click on Co-ordinate system 'Cartesian', and select 'Cylindrical-polar'. In Cylindrical-polar co-ordinates, X is always the angle, measured in radians, Y is always the radius in metres, and Z is always the axis, also in metres.
Change the X-Domain Size to 6.28319 radians (2 PI).
Change the Y-Domain size to 0.2 m.
Leave the Z-Domain Size at 1.0 m.
Click 'OK' to close the Grid mesh settings dialog.
Click on 'Sources'. Click on 'Velocity' next to 'U values are', and select 'Angular Velocity'. From now on, all references to U velocity inlet and initial values are interpreted as radians per second.
Click on 'All slabs off' next to 'Cyclic boundaries', and select 'All slabs on'. This allows fluid to pass freely through the boundaries at X=0 and X=Xmax.
Click on 'Top menu' and then on 'OK'.
Click 'Reset' on the Movement control panel, then 'Fit to window' to re-scale the view to fit the geometry. Use the movement control buttons to get a view similar to that shown at the start of the tutorial.
Create the fluid inlet:
Click on 'Settings', 'New', 'New Object', 'Inlet'. Select the Z plane for the inlet to lie in. The Object specification dialog box will appear.
Change name to INLET.
Click on 'Size' and set SIZE of the object as:
Xsize: 'To end'
Ysize: 0.1
Zsize: 0.0
Click on 'Place' and set POSITION of the object as:
Xpos: 0.0
Ypos: 0.1
Zpos: 0.0
Click on 'General'.
Click on 'Attributes' and set velocity in Z-direction to 1.0 m/s.
Set the X-direction velocity to 20 radians/s.
Click on 'OK' twice to exit from the Object specification Dialogue Box.
Create the fluid outlet:
Click on 'Settings', 'New', 'New Object', 'Outlet'. Set the Z plane for the outlet to lie in.
Change name to OUTLET.
Click on 'Size' and set SIZE of the object as:
Xsize: 'To end'
Ysize: 0.2
Zsize: 0.0
Click on 'Place' and set POSITION of the object as:
Xpos: 0.0
Ypos: 0.0
Zpos: 'At end'
Click on 'OK' to exit from the Object specification Dialogue Box.
Create the central blockage:
Click on 'Settings', 'New', 'New Object', 'Blockage'.
Change name to CENTRE.
Click on 'Size' and set SIZE of object as:
Xsize: 'To end'
Ysize: 0.1
Zsize: 0.3
Click on 'OK' to exit from the Object Dialogue Box.
Create the orifice plate:
Click on 'Settings', 'New', 'New Object', 'Plate'. Select the Z plane for the plate to lie in.
Change name to ORIFICE.
Click on 'Size' and set SIZE of object as:
Xsize: 'To end'
Ysize: 'To end'
Zsize: 0.0
Click on 'Place' and set POSITION of object as:
Xpos: 0.0
Ypos: 0.1
Zpos: 0.6
Click on 'OK' to exit from the Object Dialogue Box.
Create the outer wall:
Click on 'Settings', 'New', 'New Object', 'Plate'. Select the Y plane for the plate to lie in.
Change name to WALL.
Click on 'Size' and set SIZE of object as:
Xsize: 'To end'
Ysize: 0.0
Zsize: 'To end'
Click on 'Place' and set POSITION of object as:
Xpos: 0.0
Ypos: 'At end'
Zpos: 0.0
The new plate completely hides the inside of the domain. Click on 'Options' and tick 'Hide object'.
Click on 'OK' to exit from the Object Dialogue Box.
Set the grid:
Click on the 'Mesh toggle' button. The default mesh will appear on the screen.
The orange lines are region lines,and denote the edges of the bounding boxes of each object. The blue lines are ordinary grid lines introduced by the auto-mesher.
Click anywhere on the image, and the 'Gridmesh settings' dialog box will appear.
The grid in all three directions is set to 'Auto'. For this case it gives approximately 1 cell in X, 31 in Y and 48 in Z. The Y and Z grids will suffice for the tutorial, though they would not be enough for a 'real' calculation.
There is only one cell in X because there are no regions in X. To manually set the X grid, click 'X-auto' to switch to 'X-manual'. Set the 'Number of cells' in X to 20.
Click on 'OK' to exit from the Gridmesh settings dialog.
Set the remaining solution control parameters:
Click on 'Menu', then on 'Output'.
Change the monitoring point by setting
IXMON to 1,
IYMON to 23,
IZMON to 9
Click on 'Numerics'.
Set the number of iterations to 500.
Click on 'Initialisation'. Set 'Initial U values are' to 'Angular_velocity'
Enter 20 in the input box for FIINIT Value for U1, and 1.0 for W1. This will initialise the velocity field to the inlet values, and thus help convergence.
Click on 'Top menu' to return to the top menu.
Click on 'OK' to exit the Main Menu.
In the PHOENICS-VR environment, click on 'Run', 'Solver' then 'Local solver(Earth)', and click on 'OK' to confirm running Earth.
In the PHOENICS-VR environment, click on 'Run', 'Post processor',then GUI Post processor (VR Viewer) Viewer)'. Click 'OK' on the file names dialog to accept the default files.
To view:
To select the plotting variable:
To change the direction of the plotting plane, set the slice direction to X, Y or Z
![]()
To change the position of the plotting plane, move the probe using the probe position buttons
 .
.
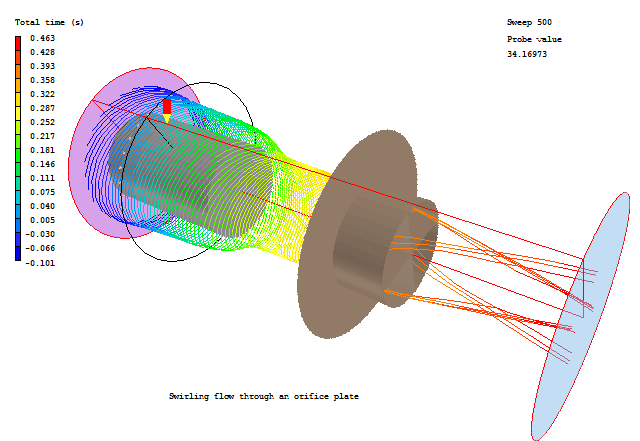
A typical plot from this case is:
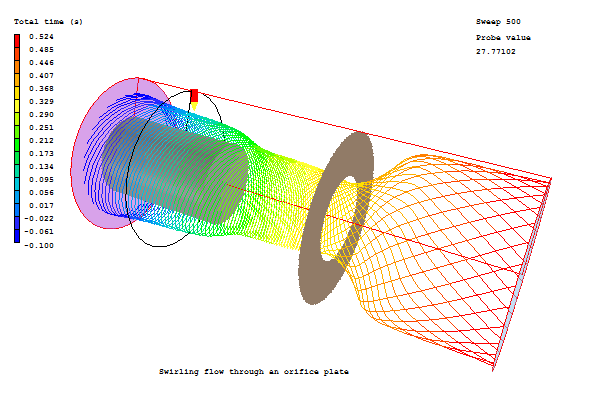
To create this plot,
Click on the 'Streamline management' button.
In the Streamline Options dialog, select the 'Streamline start' to 'Around a circle'. Set the circle radius to 0.15.
Click on 'Z' to set the Z-plane as the current plotting plane.
Set the 'Start point' (centre of the circle) to 0.0, 0.0, 0.1.
Set the 'Number of streamlines' to 30.
Now click on 'Create streamlines'. 30 streamlines will be started, evenly spaced around a circle of radius 0.15, in the Z plane, centred on the point (0.0, 0.0, 0.1).
Click 'OK' to close the dialog.
In the PHOENICS-VR environment, click on 'Save as a case', make a new folder called 'SWIRLER' (e.g.) and save as 'CASE1' (e.g.).
We will now add five plates to create the flow-straightener shown below.
Click on 'Run - Pre processor - GUI Pre processor (VR-Editor)' to return to the Editor.
Create the first plate:
Click on 'Settings', 'New', 'New object', 'Plate' and select the X plane for the plate to lie in.
Change name to PLATE1.
Click on 'Size' and set SIZE of object as:
Xsize: 0.0
Ysize: 0.1
Zsize: 0.1
Click on 'Place' and set POSITION of object as:
Xpos: 0.314
Ypos: 0.0
Zpos: 0.6
Click on 'OK' to exit from the Object Dialogue Box.
Create three more plates:
Click on 'Duplicate using array'.
Set Dimension to 4, and Pitch to 1.5708 (2PI/4) in X. Click 'OK'.
Create the outer plate:
Click on 'Settings', 'New', 'New object', 'Plate. Select the Y plane for the plate to lie in.
Change name to PLATE5.
Click on 'Size' and set SIZE of object as:
Xsize: 'To end'
Ysize: 0.0
Zsize: 0.1
Click on 'Place' and set POSITION of object as:
Xpos: 0.0
Ypos: 0.1
Zpos: 0.6
Click on 'OK' to exit from the Object Dialogue Box.
In the PHOENICS-VR environment, click on 'Run', 'Solver' then 'Local solver(Earth)', and click on 'OK' to confirm running Earth.
In the PHOENICS-VR environment, click on 'Run', 'Post processor',then GUI Post processor (VR Viewer) Viewer)'. Click 'OK' on the file names dialog to accept the default files.
Recreate the same streamline plot as before.
Note how the swirl at the exit is much reduced. As an experiment, you may care to see what happens if the outer plate is removed.
In the PHOENICS-VR environment, click on 'Save as a case', and save as 'CASE2' (e.g.) in the SWIRLER folder.