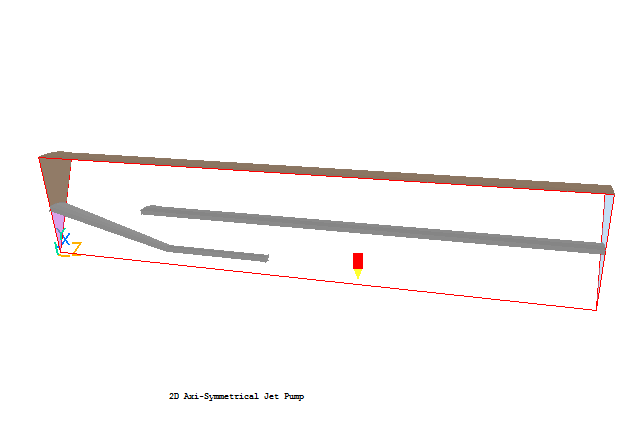
This example shows how to set up and run the simulation of a Jet Pump using VR in cylindrical-polar coordinates. It shows how to rotate objects. The flow is two-dimensional and its geometry is shown below. Velocity and pressure will be solved.

From the system level:
To enter the PHOENICS-VR environment, click on the PHOENICS icon on the desktop, or click on Start, programs, PHOENICS, PHOENICS.
From the commander level:
To enter the PHOENICS-VR environment, click on the 'Run vre' icon in the left column.
In PHOENICS-VR environment,
Start with an 'empty' case - click on 'File' then on 'Start New Case', then on 'Core', then click on 'OK'; to confirm the resetting.
To enter VR Editor:
This is the default mode of operation.
Set the domain size, and activate solution of variables:
Click on 'Main Menu' and set '2D Axi-symmetrical Jet Pump' as the Title.
Click on 'Geometry'.
Click on Co-ordinate system 'Cartesian', and select 'Cylindrical-polar'. In Cylindrical-polar co-ordinates, X is always the angle, measured in radians, Y is always the radius in metres, and Z is always the axis, also in metres.
Change the X-Domain Size to 0.5 radians.
Leave the Y-Domain size at 1.0 m.
Change the Z-Domain Size to 5.0 m.
Click 'OK' to close the Grid mesh settings dialog.
Click on 'Models'.
Use the default setting, 'solution for velocities and pressure' is ON.
Use the default KECHEN in 'Turbulence models'.
Click on 'Top menu' and then on 'OK'.
Click 'Reset' on the Movement control panel, then 'Fit to window' to re-scale the view to fit the geometry. Use the movement control buttons to get a view similar to that shown at the start of the tutorial.
Create the fluid inlet:
Click on 'Settings', 'New', 'New Object', 'Inlet'. Select the Z plane for the inlet to lie in. The Object specification dialog box will appear
Change name to INLET.
Click on 'Size' and set SIZE of object as:
Xsize: 'To end'
Ysize: 0.45
Zsize: 0.0
Click on 'Place' and use the default POSITION of object as:
Xpos: 0.0
Ypos: 0.0
Zpos: 0.0
Click on 'General'.
Click on 'Attributes' and set velocity in Z-direction to 5.0 m/s.
Click on 'OK' twice to exit from the Object Specification Dialogue Box.
Create the fluid outlet:
Click on 'Settings', 'New', 'New Object', 'Outlet'. Select the Z plane for the outlet to lie in.
Change name to OUTLET.
Click on 'Size' and set SIZE of object as:
Xsize: 'To end'
Ysize: 0.5
Zsize: 0.0
Click on 'Place' and set POSITION of object as:
Xpos: 0.0
Ypos: 0.0
Zpos: 'At end'
Click on 'OK' to exit from the Object Dialogue Box.
Create the upper secondary inlet (as an opening):
Click on 'Settings', 'New', 'New Object', 'Outlet'. Select the Z plane for the outlet to lie in.
Change name to OPEN1 (which stands for first opening).
Click on 'Size' and set SIZE of object as:
Xsize: 'To end'
Ysize: 0.47
Zsize: 0.0
Click on 'Place' and set POSITION of object as:
Xpos: 0.0
Ypos: 0.53
Zpos: 'At end'
Click on 'OK' to exit from the Object Specification Dialogue Box.
Create the upper-left boundary wall:
Click on 'Settings', 'New' and 'New Object', 'Plate'. Select the Z plane for the plate to lie in.
Change name to WALL1.
Click on 'Size' and set SIZE of object as:
Xsize: 'To end'
Ysize: 0.55
Zsize: 0.0
Click on 'Place' and set POSITION of object as:
Xpos: 0.0
Ypos: 0.45
Zpos: 0.0
Click on 'OK' to exit from the Object Specification Dialogue Box.
Create the upper inner horizontal wall:
Click on 'Settings', 'New' and 'New Object', 'Blockage'.
Change name to WALL2.
Click on 'Size' and set SIZE of object as:
Xsize: 'To end'
Ysize: 0.03
Zsize: 'To end'
Click on 'Place' and set POSITION of object as:
Xpos: 0.0
Ypos: 0.5
Zpos: 1.0
Click on 'OK' to exit from the Object Specification Dialogue Box.
Create the upper angled wall:
Click on 'Settings', 'New' and 'New Object', 'Blockage'.
Change name to BAFFLE1.
Click on 'Size' and set SIZE of object as:
Xsize: 'To end'
Ysize: 0.05
Zsize: 1.25
Click on 'Place' and set POSITION and rotation angle of object as:
Xpos: 0.0
Xrot: 15 degreesYpos: 0.45
Yrot: 0 degZpos: 0.0
Zrot: 0 degClick on 'OK' to exit from the Object Specification Dialogue Box.
Create the upper horizontal baffle:
Click on 'Settings', New' and 'New Object', 'Blockage'.
Change name to BAFFLE2.
Click on 'Size' and set SIZE of object as:
Xsize: 'To end'
Ysize: 0.05
Zsize: 1.0
Click on 'Place' and set POSITION of object as:
Xpos: 0.0
Ypos: 0.13
Zpos: 1.2
Click on 'OK' to exit from the Object Dialogue Box.
Create the upper boundary wall:
Click on 'Settings', 'New', 'New Object', 'Plate'. Select the Y plane for the plate to lie in.
Change name to T-WALL.
Click on 'Size' and set SIZE of object as:
Xsize: 'To end'
Ysize: 0.0
Zsize: 'To end'
Click on 'Place' and set POSITION of object as:
Xpos: 0.0
Ypos: 'At end'
Zpos: 0.0
Click on 'OK' to exit from the Object Dialogue Box.
Set the remaining solution control parameters:
Click on 'Menu', then on 'Output'.
Change the monitoring point by setting
XMON to 0.25,
YMON to 0.05,
ZMON to 3.0
Click on 'Numerics'.
Set the number of iterations to 500 (this is not sufficient for complete convergence, but it gives a reasonable flow field).
Click on 'Top menu' to return to the top menu.
Click on 'OK' to exit the Main Menu.
In the PHOENICS-VR environment, click on 'Run', 'Solver'(Earth), and click on 'OK' to confirm running Earth.
In the PHOENICS-VR environment, click on 'Run', 'Post processor',then GUI Post processor (VR Viewer) Viewer)'. Click 'OK' on the file names dialog to accept the default files.
To view:
To select the plotting variable:
To change the direction of the plotting plane, set the slice direction to X, Y or Z
![]()
To change the position of the plotting plane, move the probe using the probe position buttons
 .
.
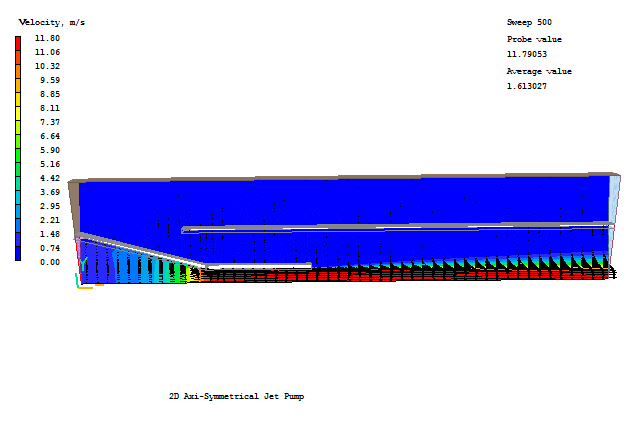
A typical plot from this case is:

In the PHOENICS-VR environment, click on 'Save as a case', make a new folder called 'JETPUMP' (e.g.) and save as 'POLAR1' (e.g.).