In this example an existing cube is changed into a pyramid.
Start with an ‘empty’ case - click on 'File' then on 'Start New Case', then on 'Core'’, then click on 'OK'; to confirm the resetting.
Create a new object
Click on 'new Object'.
Open the VR Geometry folder
Click on 'Geometry', and open the 'Shapes' folder.
Make a copy of the cube geometry file, CUBE.DAT
Change file type from *.jpg to *.*. Right-click on cube.dat, then on 'Copy' from the pop-up dialog. Now right-click on the background of the shapes folder, and right-click again. This time, select 'Paste'. This will make a copy of cube.dat at the end of the list of shapes. Right-click on the copy of cube.dat and rename it to geomtest.dat.
Edit the copied file.
Right click on geomtest.dat, and on 'Open with'. Select Notepad from the list of applications.
In Notepad.
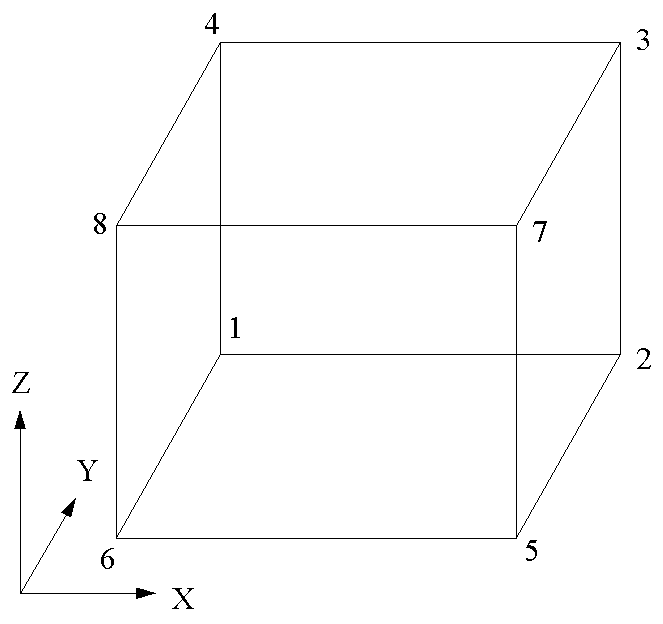
In the data file GEOMTEST.DAT, the first line gives the number of vertices making up the geometric shape.
Lines 2 to 9 are the actual vertices of the cube given as xvalue, yvalue, zvalue.
Line 10 gives the number of facets needed to make up the geometric figure.
The remaining lines define the facets. The last number in these lines is the colour of the face. The first four numbers of these lines are found by looking at a particular face and listing the points ANTI-CLOCKWISE when the face is viewed from outside the cube.
In this example the original cube is,
There are always four numbers needed to define a facet. If it is a triangular facet, then one of the numbers is repeated.
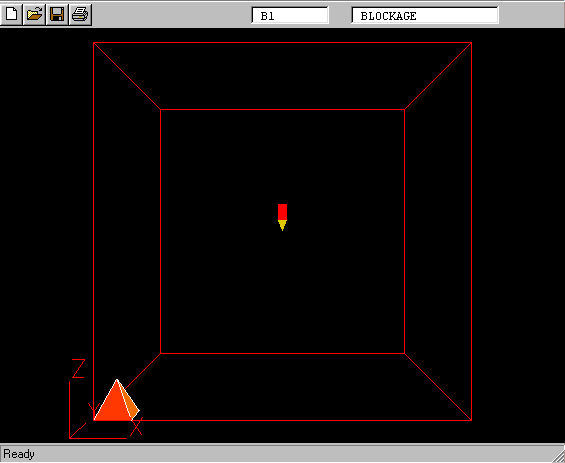
To make a pyramid from the above, change the number of facets from 6 to 5 and delete the penultimate line of the data file.
Change all x and y values to 0.5 when z = 1.0. There will be four such lines. be careful to use the same format and number of decimal places as the original numbers.
To change the colour of the cube to shades of red, set the colour code at the end of each of the last five lines to 176, 178, 176, 178, 179 respectively. Note that this value is in I3 format, so you will have to remove one of the spaces before the existing 2-digit colour numbers.
The modified file should look like:
     8
  0.0000E+00  1.0000E+00  0.0000E+00
  1.0000E+00  1.0000E+00  0.0000E+00
  0.5000e+00  0.5000e+00  1.0000E+00
  0.5000e+00  0.5000e+00  1.0000E+00
  1.0000E+00  0.0000E+00  0.0000E+00
  0.0000E+00  0.0000E+00  0.0000E+00
  0.5000e+00  0.5000e+00  1.0000E+00
  0.5000e+00  0.5000e+00  1.0000E+00
     5
     2     1     4     3   176
     5     2     3     7   179
     6     5     7     8   178
     1     6     8     4   176
     8     7     3     4   178
Save the file, and exit Notepad.
Within VR Editor
In the Shapes folder, click on geomtest.dat then on Open.
The geometry on screen should look like: