This workshop example shows how to set up and run the simulation of free surface turbulent flow of water recirculating in a shallow open pond.
The task is to simulate the velocity field along with local depth distribution.
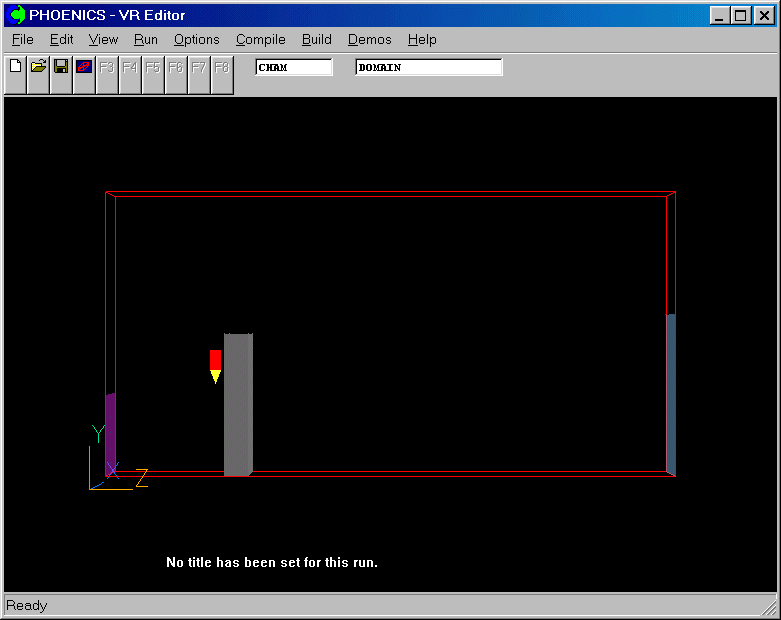
The geometry is shown in the figure below.
The flow depth at the inlet will be 0.5 m, and the inlet water velocity is 1.0 m. The water density is 1000.0, kg/m3.
From the system level:
To enter the PHOENICS-VR environment, click on the PHOENICS icon on the desktop, or click on Start, programs, PHOENICS, PHOENICS.
From the commander level:
To enter the PHOENICS-VR environment, click on the 'Run vre' icon in the left column.
In PHOENICS-VR environment,
Start with an 'empty' case - click on 'File' then on 'Start New Case', then on 'Core', then click on 'OK'; to confirm the resetting.
To enter VR Editor:
This is the default mode of operation .
Set the domain size, and activate solution of the required variables:
Click on 'Main Menu' and set 'A whirlpool in a shallow pond' as the Title.
Click on 'Geometry'.
Change the Y-Domain Size to 10 m.
Change the Z-Domain Size to 20 m.
Set the number of cells to 14 in Y and 24 in Z.
Click 'OK' to close the Grid mesh settings dialog.
Click on 'Models'.
Leave the 'Solution for velocities and pressure' ON.
Click on 'Turbulence models' and select 'CONSTANT'
Click on 'Settings' and set 'Turbulent viscosity' 2.e-4
Click 'Previous panel' to get back
Activate anisotropic analog of shallow-water equations:
Click on 'Properties'.
Set 'Use property tables' OFF
Click on 'Density' CONSTANT, from the list of options select'Isentropic' and click 'OK'
Set RHOA=(2*1000./9.81)1/2=14.278 and RHOB=0.5
Change 'Storage' ON
Change 'Viscosity' 1.e-6
Click on 'Page Dn' and Set 'Reference pressure' 1000.*9.81*0.52/2.= 1226.
Click on 'Page Up' and then click 'Top menu' and click 'OK'
Click on 'Reset' button and 'Fit to window'.
Create the BEAM object:
Use the view toggles to adjust the view point, as appropriate.
Click on 'Settings', 'New' and 'New Object' to bring up the Object specification dialog box.
Change name to BEAM.
Click on 'Size' and set SIZE of object as:
Xsize: 1.0
Ysize: 5.0
Zsize: 0.83
Click on 'Place' and set POSITION of object as:
Xpos: 0.0
Ypos: 0.0
Zpos: 4.17
Click on 'General'.
Select Type: Blockage (default).
and on 'OK' to close the Object Specification Dialogue Box.
Create the WATER-IN object:
Click on 'Settings', 'New' and 'New Object' to bring up the Object specification dialog box.
Change name to WATER-IN.
Click on 'Size' and set SIZE of object as:
Xsize: 1.0
Ysize: 2.86
Zsize: 0.0
Click on 'General'.
Define Type: Inlet.
Click on 'Attributes' and set velocity in Z-direction at 1.0 m/s.
Click on 'OK' to close the Attributes menu,
and on 'OK' in the Object Specification Dialogue Box.
Create the OUTLET object:
Click on 'Settings', 'New' and 'New Object' to bring up the Object specification dialog box.
Change name to OUTLET.
Click on 'Size' and set SIZE of object as:
Xsize: 1.0
Ysize: 5.7
Zsize: 0.0
Click on 'Place' and set Position of object as:
Xpos: 0.0
Ypos: 0.0
Zpos: 20.0
Click on 'General'.
Define Type: Outlet.
Leave the default values in the Attributes dialogue box.
Click on 'OK' to exit the Object Dialogue Box.
Set the remaining solution-output-control parameters:
Click on 'Numerics'.
Set the number of iterations to 150.
Click on 'Relaxation control'.
Switch 'Automatic convergence control' OFF.
Set relaxations for P1, V1, W1 and DEN1 -0.5, 10.0, 10.0 , and -0.3 respectively, in the fields provided for 'DTFALS'.
Click on 'Previous panel' to get up.
Click on 'Output'.
Change the monitoring point by setting
IYMON to 5,
IZMON to 5.
Click on 'Top menu' to return to the top menu.
Click on 'OK' to exit the Main Menu.
In the PHOENICS-VR environment, click on 'Run', 'Solver'(Earth), and click on 'Yes' to confirm the action.
In the PHOENICS-VR environment, click on 'Run', 'Post processor',then GUI Post processor (VR Viewer) , and then click 'OK' to 'Use current result files'
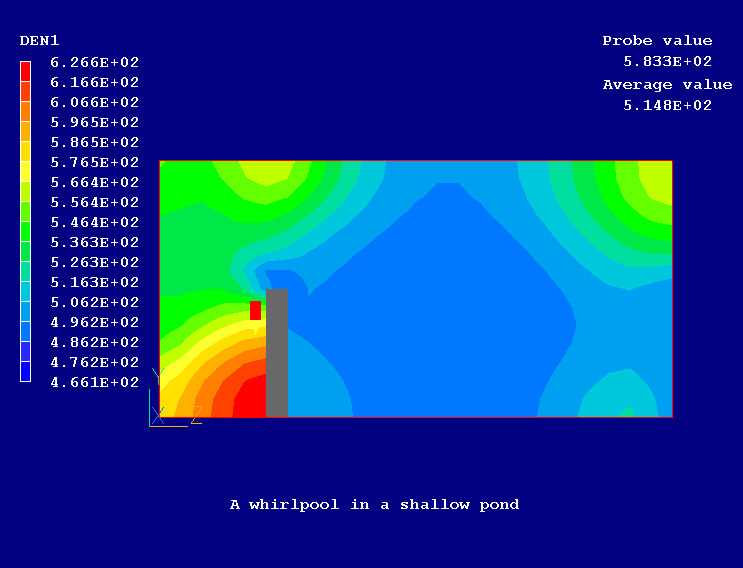
View the velocity vectors and contours of pressure and local depth.
Note that depth is represented by DEN1/1000.
The calculated depth*1000, m, distribution is shown below:
In the PHOENICS-VR environment, click on 'Save as a case', make a new folder called 'POND ' (e.g.) and save as 'CASE1' (e.g.).
svz/331/0201