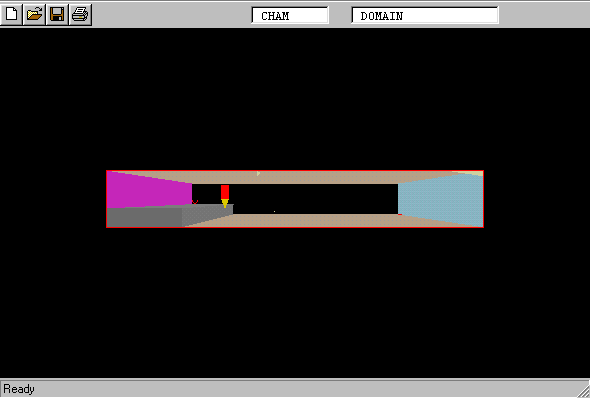
The case considered is a 2-phase solids-laden turbulent flow of air over a back-ward facing step. The basic single-phase setup is taken from Core library case 290, which is then modified to include the second, heavy, phase. The geometry is shown below:
The particles will be given a diameter of 0.1 mm and a density of 100 kg/m3. The volume fraction of particles at the inlet will be 10%, and they will be travelling at the same velocity as the carrier gas.
From the system level:
To enter the PHOENICS-VR environment, click on the PHOENICS icon on the desktop, or click on Start, programs, PHOENICS, PHOENICS.
From the commander level:
To enter the PHOENICS-VR environment, click on the 'Run vre' icon in the left column.
In PHOENICS-VR environment,
Start with an 'empty' case - click on 'File' then on 'Start New Case', then on 'Core'', then click on 'OK'; to confirm the resetting.
To enter VR Editor:
This is the default mode of operation.
Load Library case 290 and run the base, single-phase, case.
Click on 'File', then 'Load from Libraries'. Enter 290 in the 'case number' data entry box, and click OK.
Click on 'SATELLITE command prompt' and press 'return' for all the default settings until the geometry appears on the screen. You may now close the command prompt.
Activate solution of the second phase.
Click on 'Main menu'.
Click on 'Models'.
Click on 'One_phase', and from the list of multi-phase models select 'IPSA Full'. Click 'OK'.
Set interphase linkages
Click on 'Settings' next to IPSA_FULL.
Click on Interphase Drag law 'User', and from the list of Drag laws select 'Standard drag curve'. Click 'OK'.
Set the particle diameter to 1.0E-4 m, and the minimum slip velocity to 1.0E-3 m/s.
Click 'Previous Panel'.
Set properties of the second phase.
Click on 'Properties'.
Click on 'Set Phase 2 properties'.
Set the density of phase 2 to 100 kg/m3.
Set initial values
Click on 'Initialisation'
Set initial value of U2 to 13 (same as U1)
Set initial value of R1 (phase 1 volume fraction) to 0.9, and that of R2 (phase 2 volume fraction) to 0.1. You will have to use the < > buttons next to Variable to scroll the list of variables.
Set relaxation parameters
Click on 'Numerics'.
Click on 'Relaxation control', and set 'Automatic convergence control' to ON and click on 'Reset solution defaulds'
Click 'Previous panel'
Click on 'Output', and toggle Monitor display from ASCII to GRAPHICS. Set the Monitor update frequency to 1.
Click 'Top menu' and 'OK'.
Set the inlet values for the two phases
Click twice on the inlet object (called INLET). Click on 'Attributes'.
Set the inlet density to 0.9. (This is actually the phase 1 density, 1.0, multiplied by the phase 1 volume fraction, 0.9).
Click on Setting values for 'Phase 1' to switch to Phase 2. Set the inlet density for phase 2 to 10.0 (this is the phase 2 density, 100.0, multiplied by the phase 2 volume fraction, 0.1)
Set the inlet velocity for phase 2 to 13.0 m/s in the X direction.
Click on 'OK', 'OK'.
Allow the second phase to leave the domain at the outlet.
Click twice on the outlet object (called OUTLET). Click on 'Attributes'.
Set the Ph 1 Coefficient to 1.0.
Set the Ph 2 Coefficient to 100.0 (this is the phase 1 coefficient multiplied by the phase 2 density).
Click on 'OK', 'OK'.
In the PHOENICS-VR environment, click on 'Run', 'Solver', then 'Local solver (Earth)' and 'yes' when prompted to save data to files.
In the PHOENICS-VR environment, click on 'Run', 'Post processor',then GUI Post processor(VR Viewer)', and view the velocity vectors, contours and isosurfaces. Note how the contour of phase 2 volume fraction, R2, shows a 'shadow' behind the step. The heavy particles do not follow the fluid exactly.
In the PHOENICS-VR environment, click on 'Save as a case', make a new folder called 'TWOPHS' (e.g.) and save as 'CASE1' (e.g.).