In this tutorial you will learn about:
At the end of the tutorial you may like to confirm your understanding by the following exercises:
In BFC, as for Cartesian/polar co-ordinates, the geometry is created first, and the mesh is fitted later.
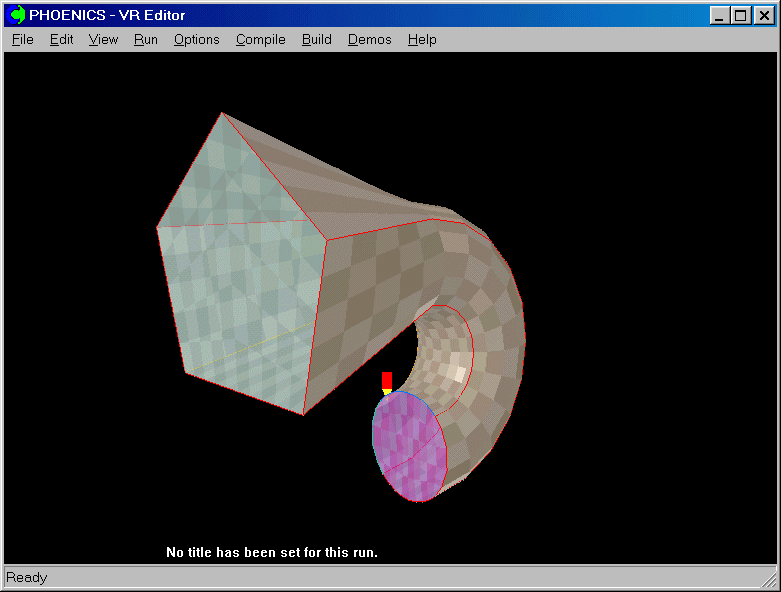
This tutorial deals with the creation of the geometry for a duct, where the cross-section changes from a pentangle to a circle along the length.
The geometry is defined in terms of Points and Lines.
Points represent either physical locations, or are used as control points for Lines.
Lines can be straight, arc segments, or splines through sequences of points.
The method employed to generate a BFC mesh requires the generation of data entities in a specific order.
The order of the data entity generation and modification is:
This tutorial covers stages 1 & 2.
From the system level:
To enter the PHOENICS-VR environment, click on the PHOENICS icon on the desktop, or click on Start, programs, PHOENICS, PHOENICS.
From the commander level:
To enter the PHOENICS-VR environment, click on the 'Run vre' icon in the left column.
In PHOENICS-VR environment,
Start with an ‘empty’ case - click on 'File' then on 'Start New Case', then on 'Core'’, then click on 'OK'; to confirm the resetting.
To enter VR Editor:
This is the default mode of operation.
Enter BFC mode by clicking on the Grid Mesh toggle ![]() on the hand-set, then clicking anywhere within the domain to bring
up the 'Grid Mesh Settings' dialog. Click on Coordinate System - Cartesian,
and select Body-fitted.
on the hand-set, then clicking anywhere within the domain to bring
up the 'Grid Mesh Settings' dialog. Click on Coordinate System - Cartesian,
and select Body-fitted.
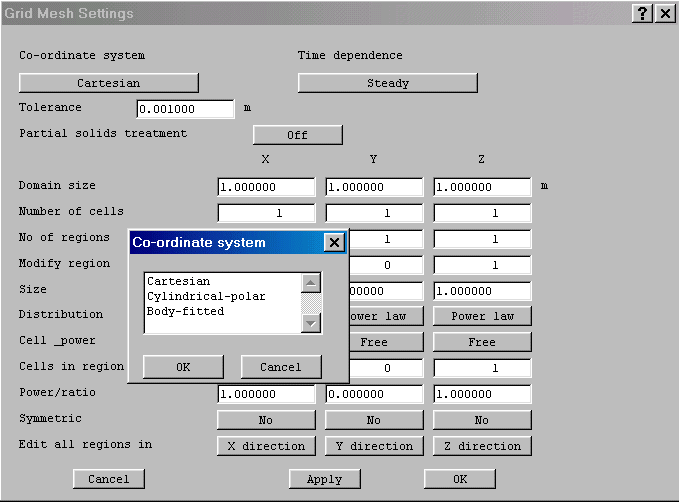
Click on 'OK' to confirm the change to BFC.
Activate the Grid Generator by clicking anywhere in the domain again. A new dialog will appear, overlaid over the hand-set.
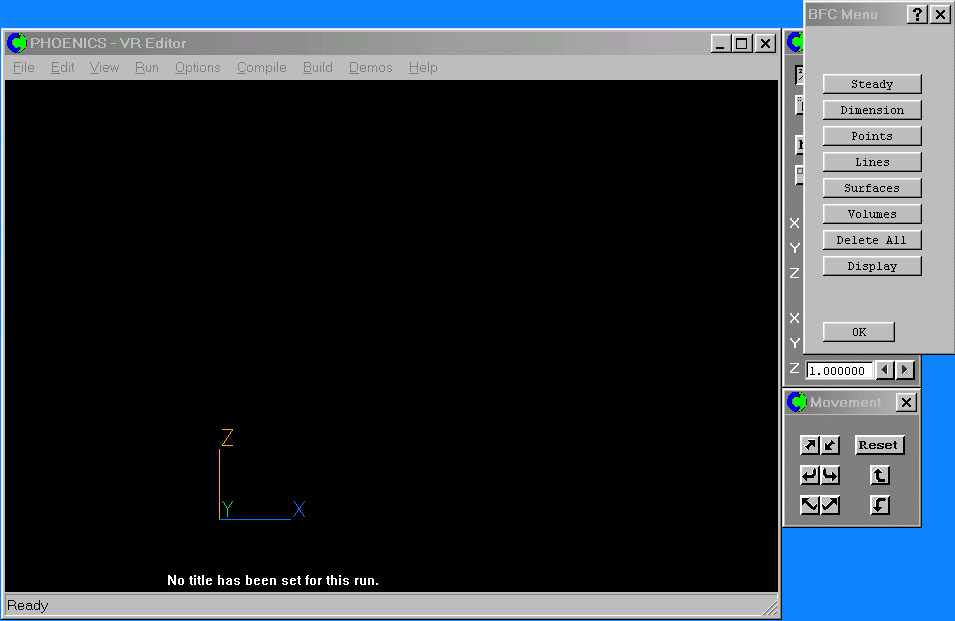
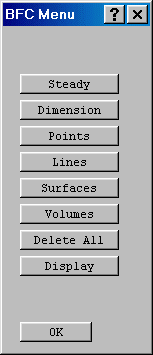
This is the main BFC Menu dialog. It contains buttons for:
| switching between steady and transient mode |
|
| setting the total number of cells, and the default domain size | |
| creating and managing Points | |
| creating and managing Lines | |
| creating and managing Surfaces | |
| creating and managing Volumes | |
| deleting unwanted entities | |
| managing the display |
The input and modification of POINTS is often easier if the view direction is normal to the plane the points are to be created on.
We want to create points on planes of constant Z so change the view to be along the z-axis by clicking the 'View down' button on the Movement control panel, and keeping it pressed until the view is more or less along Z, with Y pointing up and X to the right.
To ensure that the axis orientation is absolutely as desired, click the 'Reset' button to jump the view to be along the nearest axis.
For this Tutorial, we are going to specify two sets of points, the pentangle at z=1, and the circle at z=0.
We now create the required shape at z=1, first by generating points, and then connecting them together with lines.
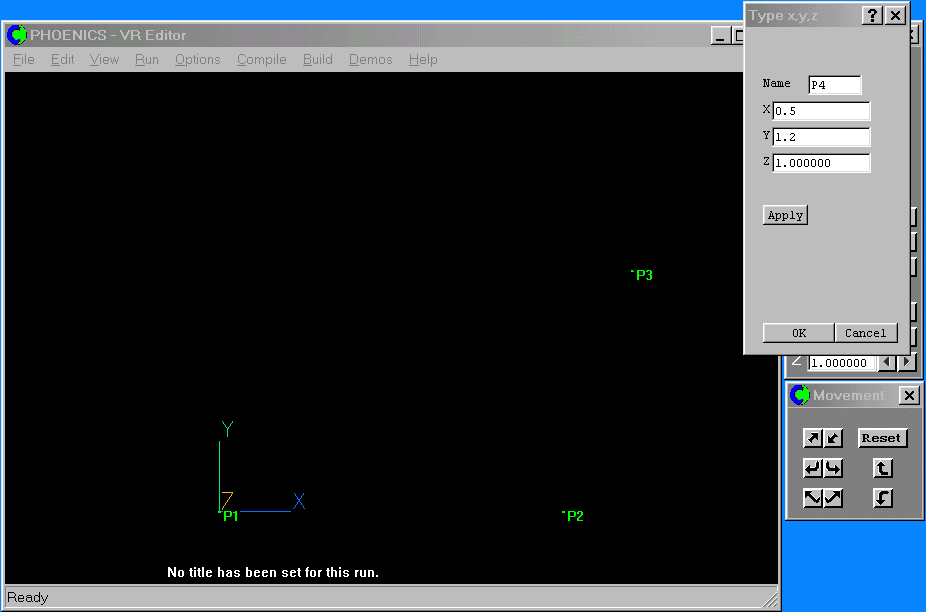
To generate points, click the 'Points' button, then 'New points', then 'Type x,y,z'. A dialog will appear, which allows the exact co-ordinates of the point to be typed in with the keyboard. The units of the co-ordinates are metres.
Create five points with the following co-ordinates:
Point name |
X co-ordinate | Y co-ordinate | Z co-ordinate |
| P1 | 0.0 | 0.0 | 1.0 |
| P2 | 1.0 | 0.0 | 1.0 |
| P3 | 1.2 | 0.7 | 1.0 |
| P4 | 0.5 | 1.2 | 1.0 |
| P5 | -0.2 | 0.7 | 1.0 |
After entering the data for each point, click 'Apply' to create the point and keep the dialog open for the next point. After entering the data for point P5, click 'OK' to create the point and close the dialog. The screen should look like this when creating point P4:
Click 'OK' twice to get back to the BFC Menu dialog.
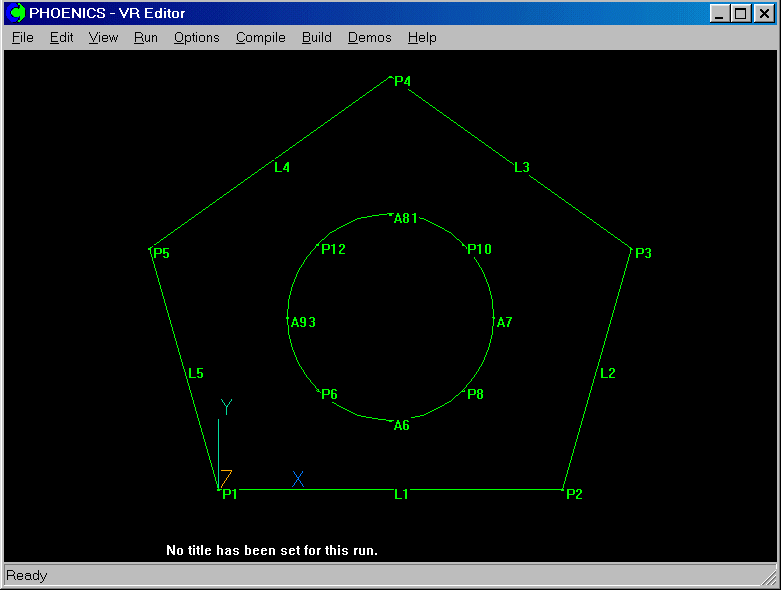
Having specified the points, create the lines to join the points together.
For this particular geometrical plane, only straight lines are required; these are generated by clicking the 'Lines' button, then 'New lines', then 'New Straights'.
Click on point P1. It will be highlighted in red to confirm selection. Select point P2. Line L1 is generated. The names of the lines are automatically generated by the grid generator and are L1, L2, .... Ln.
Now generate the other lines at z=1, by clicking on points P2 and P3, P3 and P4, P4 and P5, and finally P5 and P1. At this point, the screen should look like this:

Click 'OK' twice to get back to the BFC Menu dialog. Now create the points and lines at z =0.
The circle will be made up of four arc segments. Each arc segment is defined by three points. We thus need eight points for the circle. The circle has radius 0.3, and its centre is at (0.5,0.5,0.0)
Click on 'Points', 'New points' then 'Type x,y,z', and create eight points with the following co-ordinates:
| Point name | X co-ordinate | Y co-ordinate | Z co-ordinate |
| P6 | 0.288 | 0.288 | 0.0 |
| P7 | 0.500 | 0.200 | 0.0 |
| P8 | 0.712 | 0.288 | 0.0 |
| P9 | 0.800 | 0.500 | 0.0 |
| P10 | 0.712 | 0.712 | 0.0 |
| P11 | 0.500 | 0.800 | 0.0 |
| P12 | 0.288 | 0.712 | 0.0 |
| P13 | 0.200 | 0.500 | 0.0 |
After entering the data for point P13, click 'OK' to create the point and close the dialog.
Define the arc segments by clicking the 'Lines' button, then 'New lines' and 'new Arcs'. Arcs are defined by 3 points, selected in order from one end to the other. Click on point P6. It will be coloured red to confirm selection. Click on point P7, the control point for the first arc - it will be coloured red on selection. Finally click point P8, the last point on the first arc. The arc itself is drawn. Note the arc number is the next line number in sequence, but has an 'A' prefix.
Now complete the remaining arcs, by clicking on P8,P9 and P10, P10,P11 and P12, then P12, P13 and P6.
Once the arcs have been created, the screen should look like this:
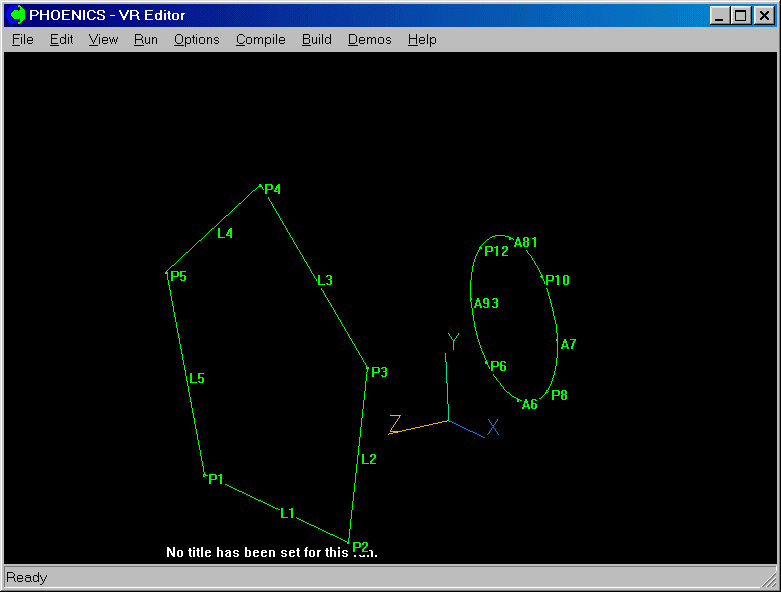
Change the view point by using the View control buttons on the Movement control panel.
If necessary, click on 'Reset' then 'Fit to window' to re-size the window to show all the lines etc.
The geometry required for the duct has now been defined. The next tutorial shows how a mesh is fitted to the geometry.
If you want to proceed directly to the next tutorial, click here.
To summarise, in this tutorial you have learnt about:
We now suggest you practice each of these functions 'live' for yourself with the following exercises:
To leave the BFC Menu, click 'OK'. To save the work so far, click on 'File', 'Save as a case', make a new folder called 'BFC ' (e.g.), and save as 'BFC1'.
Note that at this point no mesh has been created, so the VR-Editor will still show the default cube!