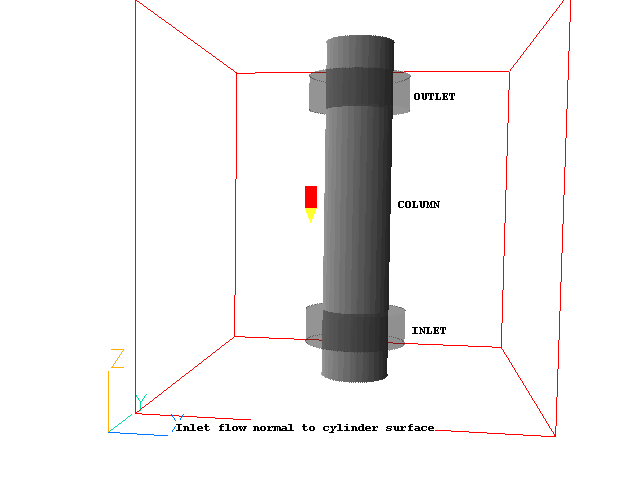
This workshop example demonstrates the use of the ANGLED-IN and ANGLED-OUT objects.
The example is a 3-dimensional stylised air-conditioner. Air is expelled from a slot all the way round the circumference of a column. It then leaves through a similar opening near the other end. The flow is turbulent and isothermal.
The geometry is to be as shown in the figure below, with all dimensions 1m :

wherein:
First activate the PHOENICS Satellite module in VR-Editor mode by either:
If you are uncertain of, or wish to change, your working directory, click on 'Options', 'Change working directory'.
When the Editor starts execution, what it shows on the screen will depend on what happens to be in your working directory. You can disregard this.
In order to make a fresh start;
You are now ready to begin.
Click on 'Main Menu' and set 'Inlet flow normal to cylinder surface' as the Title.
We can accept all the default settings for the domain size and solved variables. The domain is a 1m cube, the pressure and velocities are solved for and the Chen-Kim KE (KECHEN) turbulence model is used. To check these settings, click on 'Models'.
Click on 'Top menu'
Create the internal surfaces of the domain:
Click on 'Domain Faces'.
Set 'Wall' to 'Yes' for the Xmin, Xmax, Ymin, Ymax, Zmin and Zmax faces.
Click on 'OK' to close the Domain Faces Dialogue Box, and 'OK' again to close the reminder to set / check boundary conditions. The default settings are fine.
Click on 'OK' to exit the Main Menu.
Click 'Reset' on the Movement control panel, then 'Fit to window' to re-scale the view to fit the geometry.
Create the objects making up the scene
Click on the 'Object Management' button (O on the toolbar or
on the hand set). This will display a list of objects, currently the six domain-face plate objects.
Select all the PLATE objects, then right-click and 'Hide objects'. This will prevent the plates from obscuring the inside of the domain.
Create the COLUMN object:
In the Object management dialog, click on 'Object', 'New', 'New Object', 'Blockage'.
Change name to COLUMN
Click on 'Size' and set SIZE of object as:
Xsize: 0.2
Ysize: 0.2
Zsize: 1.0
Click on 'Place'. Switch to 'Centre' and set the centre Position of object as:
Xpos: 0.5
Ypos: 0.5
Zpos: 0.5
Click on 'General'.
Click on 'Shape'. Click on Geometry and select public/shapes/cylinder' as the geometry file, then click 'Open'.
Click on 'OK' to close the Object Specification Dialogue Box. COLUMN will now appear in the Object Management list of objects.
Create the INLET object:
Click on 'Object', 'New' 'New Object', 'Angled-in'.
Change name to INLET .
Click on 'Size' and set SIZE of object as:
Xsize: 0.3
Ysize: 0.3
Zsize: 0.1
Click on 'Place'. Switch to 'Centre' and set the centre Position of object as:
Xpos: 0.5
Ypos: 0.5
Zpos: 0.15
Click on 'Shape'. Click on Geometry and select public/shapes/cylinder' as the geometry file, then click 'Open'.
Click on 'General'.
Note that the shape and size of the angled-in object do not really matter - what matters is the size and shape of the area of intersection between it and any blockage which it overlaps. In this case the active inlet area will be the outer surface of the COLUMN object which lies within INLET.
Click on 'Attributes' to set the inlet condition.
For 'Method' select 'Normal velocity'. Enter 5.0 m/s for the velocity normal to the blockage surface and click 'OK' to close the Attributes dialog.
Click on 'OK' to close the Object Specification Dialogue Box.
Create the OUTLET object:
Click on 'Object', 'New', 'New Object', 'Angled-out'.
Change name to OUTLET.
Click on 'Size' and set SIZE of object as:
Xsize: 0.3
Ysize: 0.3
Zsize: 0.1
Click on 'Place'. Switch to 'Centre', and set the centre Position of object as:
Xpos: 0.5
Ypos: 0.5
Zpos: 0.85
Click on 'Shape'. Click on Geometry and select public/shapes/cylinder' as the geometry file, then click 'Open'.
Click on 'General'.
Note that the shape and size of the angled-out object do not really matter - what matters is the size and shape of the area of intersection between it and any blockage which it overlaps. In this case the active outlet area will be the outer surface of the COLUMN object which lies within OUTLET.
Click on 'OK' to close the Object Specification Dialogue Box.
Set the grid:
Click on the 'Mesh toggle' button. The default mesh will appear on the screen.
The orange lines are region lines,and denote the edges of the bounding boxes of each object. The blue lines are ordinary grid lines introduced by the auto-mesher.
The auto-mesher does a good job giving a mesh of 52 cells in X and Y and 54 in Z. This is rather too fine for the purposes of the tutorial, as the case would take too long to run.
For now, we will coarsen the grid in all 3 directions.
Right-click anywhere on the image, and the 'Auto meshing' dialog box will appear. Moving the slider to the left will increase the number of cells, moving it to the right will decrease the number of cells.
Select the X direction. Move the slider to the right until there are 32 cells shown in X. This will happen when the 'Minimum cell fraction' is around 2%.
Select the Y direction, and change the view slightly so that the Y grid becomes visible. Move the slider to the right until there are 32 cells shown in Y. This will happen when the 'Minimum cell fraction' is around 2%.
Select the Z direction. Move the slider to the right until there are 30 cells shown in Z. This will happen when the 'Minimum cell fraction' is around 2%.
Click 'OK' to close the Auto meshing dialog.
The final mesh should look like this:
Click on 'Mesh toggle' again to turn off the mesh display.
Set the remaining solution-control parameters:
Click on 'Main Menu' and then on 'Numerics'.
The default number of iterations is 1000. This is more than enough to test if a model is set up correctly, but is rarely enough to obtain a converged solution.
Reset the total number of iterations to 400.
Click on 'Top menu' to return to the top menu.
Click on 'OK' to exit the Main Menu.
Setting the Probe Location
It is a good idea to place the probe in a suitable place to monitor the convergence of the solution. Too close to an inlet, and the value will settle down very quickly before the rest of the solution. Placed in a recirculation zone, it may still show traces of change even though the bulk solution is converged. In this case, somewhere in the middle of the domain is fine.
Click on the probe icon
on the toolbar or double-click the probe itself, and move the probe to X=0.3, Y=0.3, Z=0.5.
In the PHOENICS-VR environment, click on 'Run', 'Solver'(Earth), and click on 'OK' to confirm running Earth.
In the PHOENICS-VR environment, click on 'Run', 'Post processor',then GUI Post processor (VR Viewer) . Click 'OK' on the file names dialog to accept the default files.
To view:
To select the plotting variable:
To change the direction of the plotting plane, set the slice direction to X, Y or Z ![]()
To change the position of the plotting plane, move the probe using the probe position buttons
 .
.
Alternatively, click on the probe icon ![]() on the toolbar or
double-click the probe itself to bring up the Probe Location dialog.
on the toolbar or
double-click the probe itself to bring up the Probe Location dialog.
A typical plot from this case is:
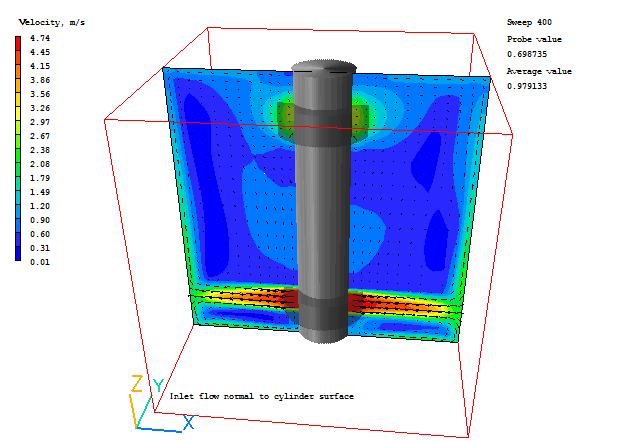
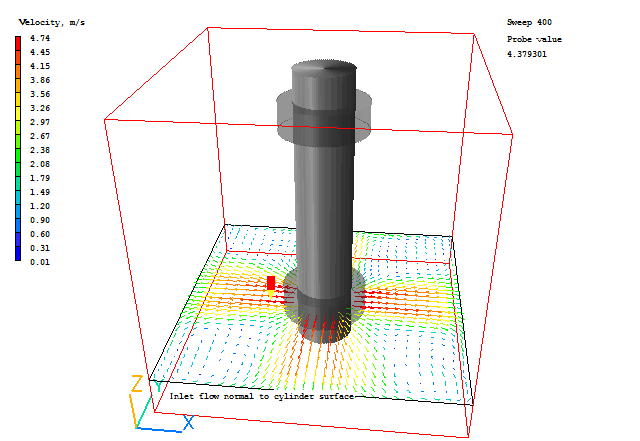
It is very important to know whether the inflows and outflows of mass and energy are in balance. If they are, it is a good sign that the solution is convergent. If they are not, the solution is definitely not converged. For further information on the assessment of Convergence, see the lecture Convergence monitoring and control.
Open the Object Management dialog, and right-click on the Domain entry. From the context menu select 'Show results'.
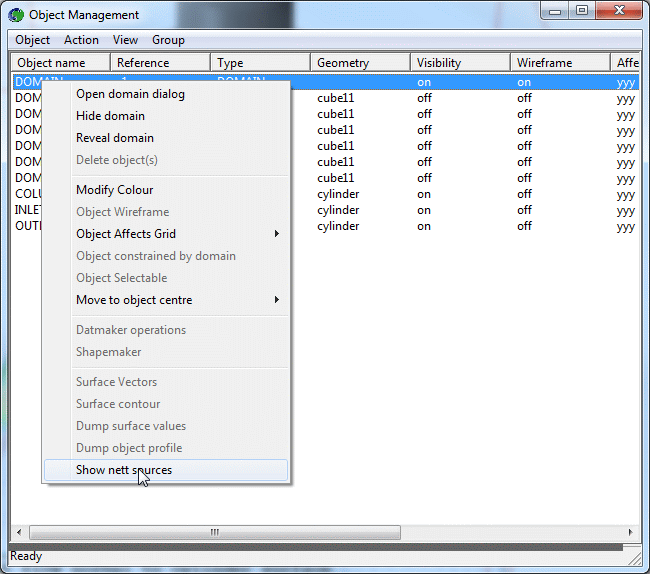
This will display the sources and sinks of all variables.
The section showing 'Nett source of R1 at...' shows the mass source in kg/s at each inlet and outlet.
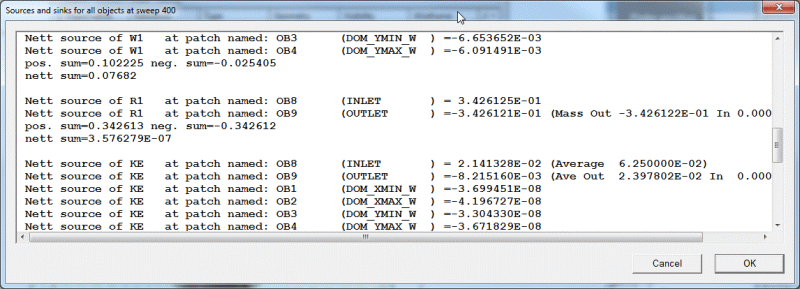
Positive values are inflows,negative values are outflows. The 'nett sum' at the end of the section should be close to zero, as all the mass entering must leave.
These balances can also be checked by inspecting the RESULT file. This contains an echo of the inputs, a selection of the solution and the source balances. Click on 'File', 'Open file for editing', then 'Result'. Scroll down the file until you reach the section headed 'Sources and sinks'.
In the PHOENICS-VR environment, click on 'Save as a case', make a new folder called 'ANG-IN2 ' (e.g.) and save as 'CASE1' (e.g.). Return to the VR-Editor by clicking 'Run' - 'Pre-processor' - 'GUI Pre-processor'.
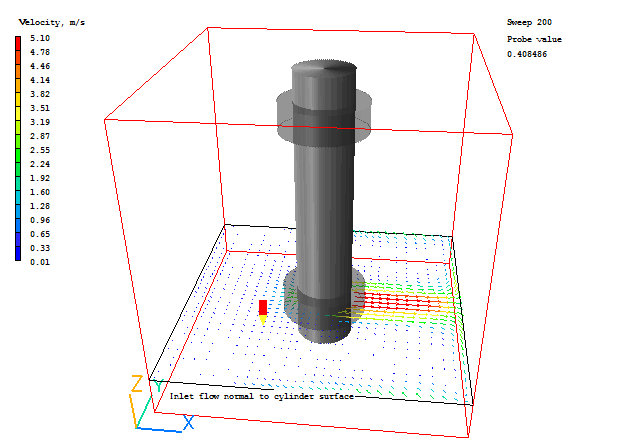
In the run just made, the inflow condition was set to 5.0m/s normal to the surface of the underlying blockage. Another option is to set the cartesian components of the inflow vector.
Double-click on the INLET object to bring up its Object Specification dialog. Click on 'Attributes'. Change the 'Method' from 'Normal velocity' to 'Velocities'. Leave the X direction at 5.0m/s and the Y and Z directions as 0.0m/s. The side of the column where X > 0.5m (the right) will act as a source, the side where X < 0.5 (to the left) will act as a sink. Click 'OK' to close the Attributes dialog, then again to close the Object Specification dialog.
Click on 'Run' then 'Solver' to run the solver again.
Enter the Viewer and inspect the solution.
Check the mass balance again, either by opening the Result file, or from the Object Management dialog in the Viewer as explained above. You should find that the mass source (source of R1) at the INLET object is very close to zero, as the mass source on the right side is canceled by the mass sink on the left.
The flow is very different, as seen in the vector field:
Save the new results into the 'ANG-IN2' folder as 'CASE2'.